Tuesday, November 30, 2010

In Constant Flux


One of the things that I have found so interesting about this process is just how much things change from what I originally intended for design and layout of this home. Now, its not that every person building / rehabbing a home is as engrossed in the process as I am, but there are many that are. For those people who are, its a constant battle to try and keep the idea you have in your head matched with the reality of the process of developing the home. Take for instance just the structure of the porch. I never intended to re-do that entire porch, yet here we are looking at an entirely new porch on the house. While it really wasn't an option to not re-build the porch, I still didn't think about the house with a new porch attached when I viewed in my mind at the beginning of this process.


Even the things you change on the fly end up different in the end then they were intended in the beginning. I never had any intention of using a redwood stain on this deck, but when I had to choose a stain for the fence I decided to go with a redwood color. As such, that made the decision for the rest of the house as a result. This "stain" is as much paint as it is stain, so its covering the wood grain quite a bit as well as adding color. This is giving the house a more streamlined and finished look since it doesn't have that natural treated lumber color everywhere you look. I was a bit put off by the color as it was going on the decks, but its growing on me to the point that I am quite happy with the results so far and would like for the wind and rain to cease so the painters can finish the decks and I can see the whole thing complete.


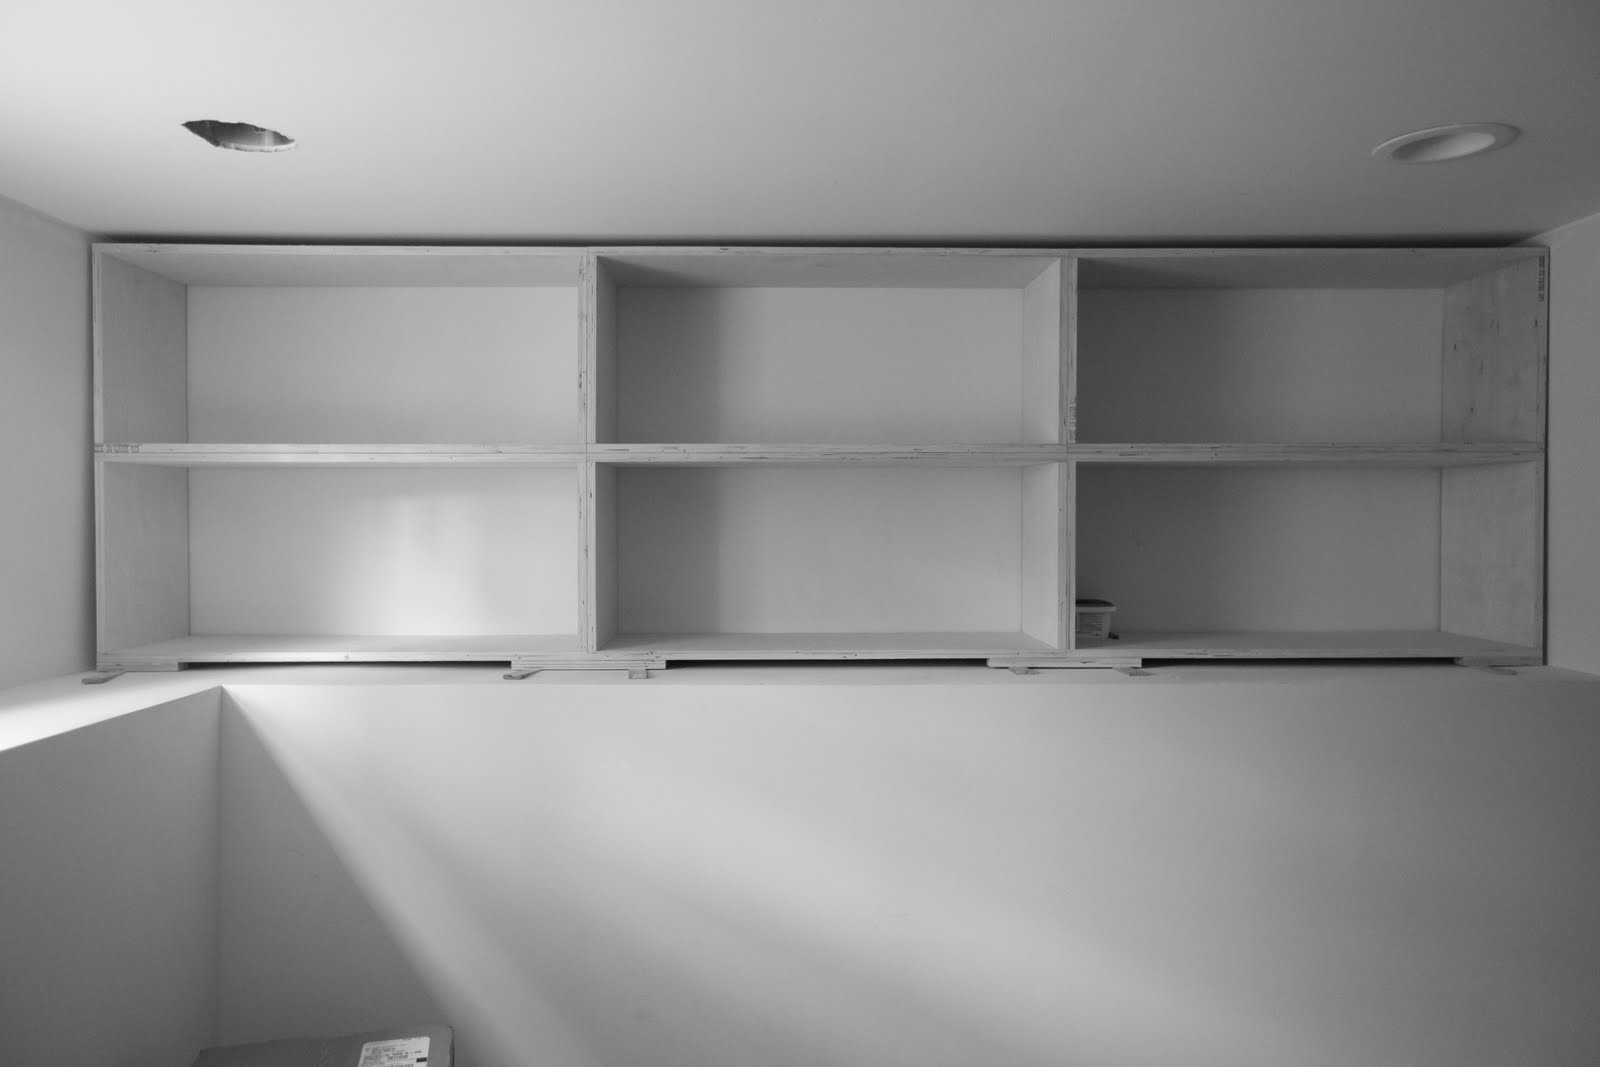
Here is a shot of the beginnings of the built in woodwork I am having built/installed on the first floor. The finish carpenter is doing a great job of creating very solid and very thick bookshelves that will eventually encompass much of the east wall to create a "library" area. With this area of the home I have never been sure exactly how to use the space well. Since we have been living in almost the same layout for the last six years, we know how difficult it is to fully utilize this layout with the long thin rooms. Part of the reason we got rid of the fireplace in the beginning was to make this middle room more open and usable.The goal for this space was to get some use out of it while allowing the adjacent spaces to encroach on them to make those spaces more useful. In this case both the dining area and the main living space on the first floor will benefit by bleeding over into these spaces a bit without severly affecting the "feel" of the library area. How did this change? This was originally going to have a fireplace on the west side of the room and a small low bookshelf on the east wall......


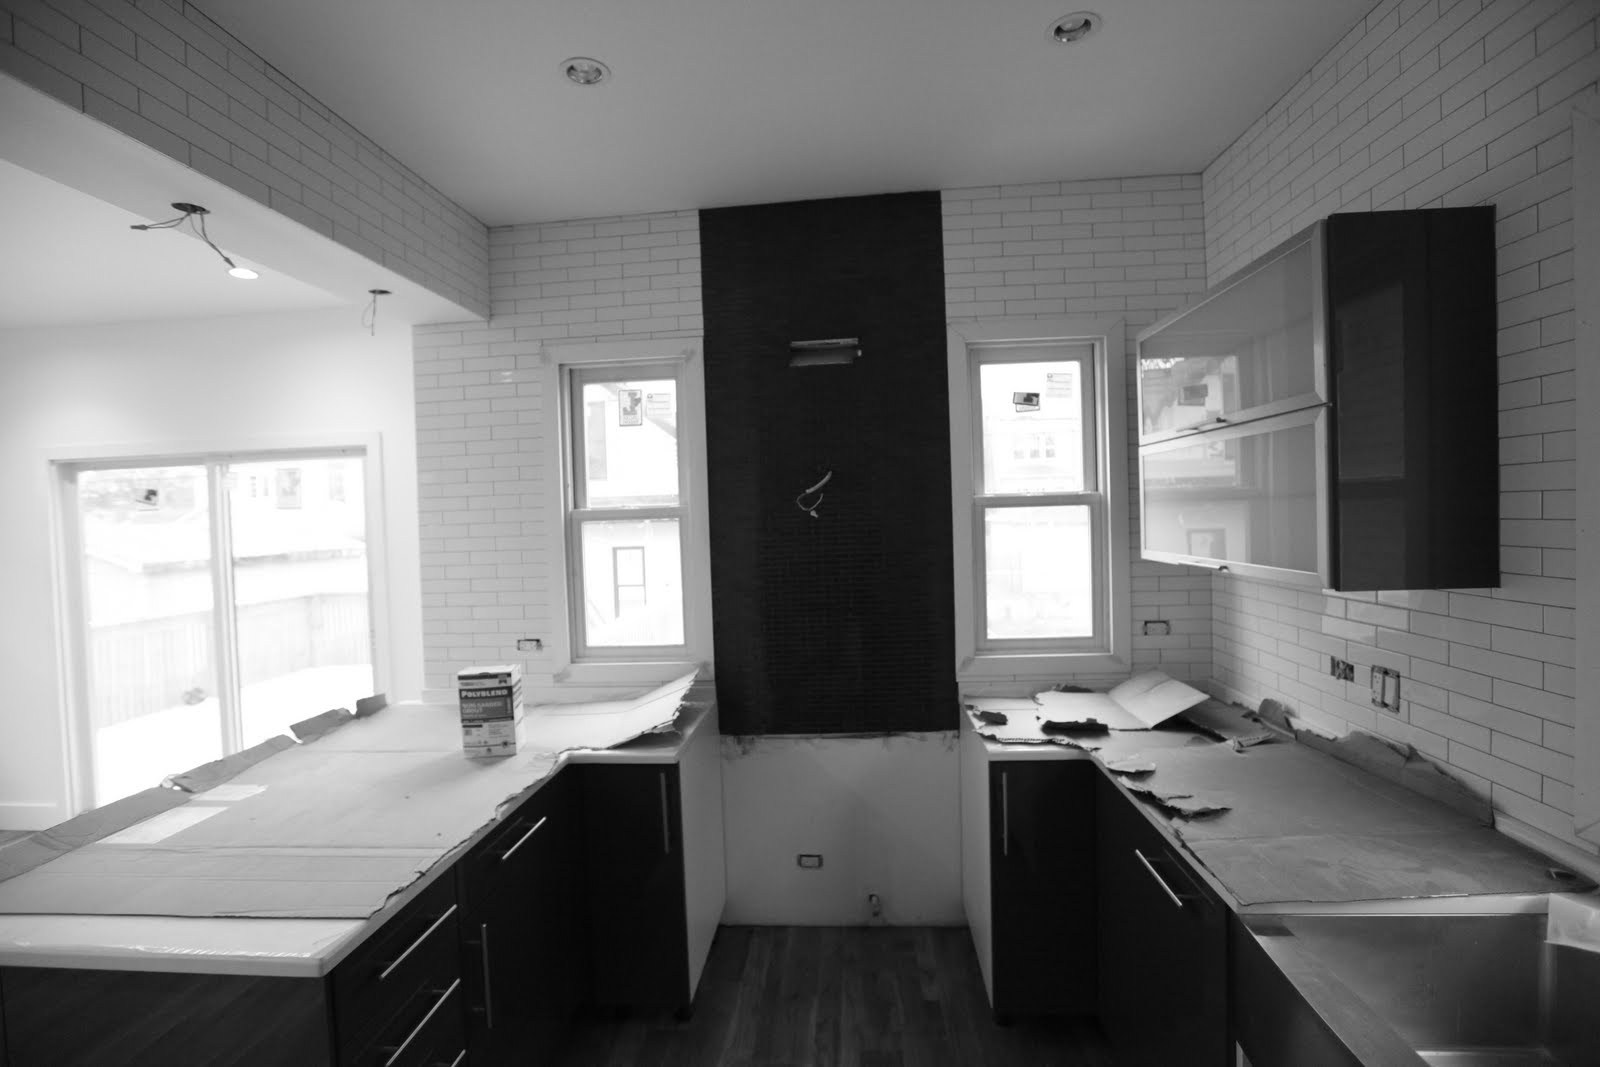
Here is the master bath getting closer to completion. The only thing that has really been consistent from the beginning in this space is the vanities and the sconces. Pretty much everything else has changed at some point. I detailed earlier how the tile layout on the back splash changed as a result of the look I decided I wanted, thats basically the way that the whole house has gone. The changes here aren't finished either - I have an idea about the way the glass insets above for the clerestory windows are going to go, but I won't be 100% sure thats the case until its built and installed.


I just wanted to post this picture because I am just amazed at how much of a mess this house is CONSTANTLY. If there is one that that has not changed at all from the beginning - tradesmen know how to make a complete mess out of absolutely anything. I can literally clean up every single day and have the place look like a complete mess the next day. Some of these tradesmen are downright disgusting. Some of the things I have cleaned up have made me cringe. I know that I am not paying for seriously high end labor, but some of these people have to be the messiest people I have ever encountered. What I would really like to know with a certain number of these individuals is what their home looks like. Actually, I dont think I want to know.... but as you can tell, its pretty frustrating to deal with.

We are progressing towards the finish line very quickly. The goal is to have Plumbing, Electrical, HVAC, and construction permits finalized by Friday. That will leave us to finish the painting, flooring and all of the finer points over the course of the week next week. Its going to be a race to the finish.


Friday, November 26, 2010

I Am Thankful For.........


Lots of things, but mainly progress. Progress is happening at the house every single day. Things are progressing so quickly in most cases that I am not able to keep up on the blog with what has been happening around the house. The vent hood going in is a good example. This happened on Tuesday, but I just have not gotten around to getting a good photo of it. So what you are seeing here is a vent hood made by Zephyr. Its not white as the picture might indicate, thats just the white protective coating on the stainless that I am going to leave on until the last days leading up to our move. Its hard to leave it there that way since I want to see it fully installed, but I just dont want to risk it getting scratched.


We also had all of our appliances delivered on Monday. A GE fridge and a Gas Range, Dryer, and Washing machine by Fisher Paykel. The range is not installed yet, so there are no pictures of it. Its just sitting in the middle of the kitchen waiting for the plumber to update the gas line connection so the stove can be connected. One thing the appliance delivery signals for sure - we are nearing the end of this process, and the final finishing touches are beginning to come through.


Lighting fixtures are also being installed. This is a photo of the light that is going over the sink in the kitchen. I originally had a different light in mind for this space, but when it was delivered it just wasn't what I thought it was going to be. It ended up being the only fixture I have ordered to this point that I have returned. Instead, I chose this light and I am pleased with the choice. Its a very simple aluminum frame with pieces of thin lucite sticking in the slots cut for them. When its lit up it glows like a ball. Its a nice compliment to the space and works well with the porcelain tile and the stainless steel sink.


This is the master bathroom. I have been detailing this very much because we weren't really making any progress and then BAM it was all done in like 3 days. This is not the way it was envisioned when it was first laid out, but I really like the end result. The blue glass tile was not originally meant for the back splash here, but I like the color contrast between that tile, the counter top, the back splash tile, and the chrome faucets. The more I look at the "linen" finish on the tile, the more I like it. Its got such a nice smooth finish, and doesn't seem to dominate the space even if a good portion of the one wall is covered with the tile. I look forward to this space being finished in the next week or so.


This is a shot of the base shoe that was put down in the house on Tuesday. Traditionally most homes are finished with what is called quarter round, and its literally just a wedge of wood nailed in where the baseboard meets the floor board. I am not a huge fan of the quarter round. Especially with my desire to have this house be contemporary; I just didnt see quarter round fitting into the design scheme. So, Richard the magician carpenter "ripped" down a 1 x 4 pre-primed wood that was used for the baseboard originally and we had left over. Richard and his employee Adam did a great job with the detailing and the angled cuts on the base shoe for the whole house. Its going to be something that stands out in the house for years to come.

This coming week is going to be crazy. We are going to be finishing most everything in the house with the exception of the mystery item, and maybe the floors.

Sunday, November 21, 2010

The Finer Points


One of the best parts of the house being this closed to finished - being able to bring the girls over to the house to look around and so we can get some things done. Both of the girls room are as close to complete as any room in the house. We were over at the house yesterday taking a look around, and the girls helped us clean up the cabinets in the kitchen.


The floors have been sanded and have one coat of polyurethane on them. They are finally starting to take shape and part of that is seeing the grain and benefit of the design of the hardwood. This is white oak, so as it ages the floors will get more gray, whereas if you were putting in red oak it would turn more pink. So hopefully these floors will be a bit lighter and quite a bit more gray 5 years from now. With the house being full of neutral colors, the floors could easily age into a color that is more conducive then it is now. I am very interested to see how it goes over time.


Same view, just from the opposite angle. Also, this picture is setup so you can see that there is an inconsistent refection on the floor - that is due to the different pieces of wood absorbing different amounts of the polyurethane. Originally the plan was to but both coats of polyurethane down at once, but we hadnt turned on the furnaces yet and were forced to let the floors cure another day. That made the tile work that was finished yesterday more important to be done then a second coat of polyurethane; which can be done anytime between now and the end.


This pictures shows both the finished stairs, and the finish on the stairs. As you can see, the stairs were capped with white oak as well, and we will be putting a handrail down with a carpet on the stair treads to finish them off. We decided to cap them off instead of using a ledger board stringer cap that runs down the sides between the wall and the stairs. I think this look is much cleaner and simpler this way.


Top of the stairs looking down. I am quite happy with the character of the wood in the stairs. I chose to go with #1 grade white oak instead of select or better. The reason I decided to do this was twofold: #1 grade is more prone to inconsistencies and knots which I think add character and its $.20-.30 cheaper per foot so its a pretty simple decision. When this is finished its going to be one of the best spaces in the house I think. Lots left to do here including the chandelier which I have not talked about yet.


Its off angle, I know. I have been taking this same picture over and over and this one came out crooked. I think part of that was having the girls with me. Excuses, Excuses...I know. Either way this is a dramatically changed vantage point over the course of those photos. Now you can see the updated floors and the girls wall colors. Funny how the soft muted pink and purple turned into these vibrant colors. Funnier how we are pleasantly surprised with just how vibrant a color they are. Why not right? Can't think of a reason in the world not to let the girls have their rooms the color of their choosing.


Updated shot of the garage about 95% from completion. All that is left here is the balance of the siding in the gable, put the lights on the outside walls, and to have the corners and window trims painted. The trim around the windows will be black as they are on the house, and the trim on the corners and around the doors will be gray as they are on the house. I just received the lights that go on the north wall of the garage. These are the lights that will make the difference on the patio, and I chose 13" soft white outdoor lights. I am hoping that its going to be enough. The light over the door to the garage is a multi-directional motion sensing light that will have one eye on the back gate of the fence.


Here you can see the fence nearing completion. The door was put on yesterday and should have wood on it yet today, and they began to stain it the cedar colored waterproof stain that I chose. This is the future color of the porch. Note: we have to leave the porch until the spring to be stained. Pressure treated lumber takes something like 6months to cure and its quite normal to wait a minimum of that time before treating or painting the wood. If this is done its the best way to ensure the maximum amount of adherence and protection the application being used affords. Amazing the little things you pick up along the way.


Inside shot of the fence which makes up the dog run. The inside was stained yesterday. When the men are done in here I will come and clean up this space making sure to get all of the nails and shreds of metal that might be in here. From there I will be putting in a plastic barrier pinned on the bottom of the fence and secured into the ground. This barrier will prevent the pea gravel I am going to put down in there from getting pushed out under the fence and into my neighbors property. Its probably going to take a little while, but it will become a solid dog run by next summer.


The kitchen is really coming together. Everything is done with the back splash, the counter top, and pretty much everything with the cabinets (except for two things - cabinets under the sink have to be trimmed, and the kick board under one of the cabinets needs a register vent hole cut into it). As you can see, I put some cardboard on the counter tops in an effort to try and prevent any sort of damage that might accidentally happen in the with the finishing work in the kitchen.


The windows on the north wall are prominent in this photo. I would think that in a little more then a week we will be putting this glass into the space (which will make Jen quite happy). When its done my guess is you will see a recessed window with a black frame on this side, and a nearly flush mounted window framed in white on the stair side. The other thing noticeable in this photo: how uneven the house still is. Look at the line where the ceiling meets the tile. Notice the thicker gray lines at the junction? That is a thick grout line where the tile guy just couldn't cut a piece of tile small enough to cram in there. These sorts of things are inevitable in certain parts of the re-design. However, its a little disappointing that with all of the work we did the ceilings are still not fully level since we used a majority of the pre-existing joists the house was built with.


This is the south wall of the kitchen. One of the reasons I took this picture is to show that I extended the tile out onto the soffit to make the whole interior of the kitchen tiled. The white subway tile has its hooks in me and I just cant stop using it :). Tomorrow ABT Electronics will be at the house to put the range into this spot, and the HVAC guy should be putting the vent hood in as well. Its going to look like a real kitchen, and by Wednesday could be a fully functioning kitchen with a faucet as well. I cannot wait to see this range and hook in place as I have been looking at them for 5 months and am ready to see how well they go together.


We are finally moving on the back splash for the master bath wall. After taking the time source the right tile from Dallas (thanks Gaelynn) the tile guy started on that yesterday. There were some fits and starts with respect to the location of the blue tile as a back splash to the sinks, and having a bit less tile then we anticipated. I think in the end this is going to work out better then I had originally planned as it will break up the back splash a bit and contrast really well with the white counter top that will go in.


This is the tile inset close-up. There is just enough blue and gray in the dark colored tile that we are putting up around this blue tile. This was not originally planned to be here, but I decided it made more sense in this space then where we were putting it before. Love the last minute decisions, they are the fun part of this process.


The shower is getting closer to being done as well. I would guess that it will be finished towards the end of the day tomorrow. I really am happy with the way the shower is turning out. Both the finish - it has a matted linen finish - to the size of the tiles being 6x24 are helping the shower to feel open and not bulky. I know its odd to say a shower feels bulky, but to give you the idea, you don't step into it and feel like you are surrounded by tile even though you are. Maybe that will change when the shower door is put in, but for now it feels like its going to be big and open the way I have been hoping.


A look up the wall of the blue tile that is centered on the fixtures in the shower. This will all be grouted with a light silver grout keeping things simple and clean. We really don't want white as it will make the shower very difficult to clean.

Did a ton of work around the house this weekend, and the fence got a lot of work as well. ABT will be delivering the appliances tomorrow, the carpenter will be putting in the vanities and the doors in the basement, the painters will be back to continue on their quest, the HVAC guys should be installing the hot water heater and radiant heat system, and the electrician should be out and running power to the garage.

We are going to try to get quite a bit accomplished in the 3 days leading up to the holiday. We could be down to the last light fixtures, the last of the painting and coat of urethane on the floors, and the final pieces of flooring (shoe) that need to go in along with the custom built stuff.

I am officially going to say December 11th is the goal to be ready to move into the house. We shall see if we can get everything done in time.

Wednesday, November 17, 2010

Warp Speed


Things are moving really quickly at the house...or so it seems anyway. I feel like I am making 15 decisions daily, and each decision is now one that will be seen in our home every day. It makes things a bit more daunting from a decision making perspective as shooting from the hip or making rash decisions can be dangerous. More then anything else I think its harder to walk the line between choosing to re-do something that has been done incorrectly (or not right according to what I thought would look right) and going with the flow and finding a happy medium that will work with what has been done, and what was thought to be done. Above is an example of going with the flow. This is a shot of the wall tile in the master shower. It wasnt originally supposed to be two tiles wide for the glass tile that runs down the middle of the tile. However, there was a "mis-communication" between me and the tile guy. He heard me say center it on the wall, when I had said center it on the spout and control valve of the shower. Well, my decision came down to ripping out all of the tile that had been installed "incorrectly" or doubling the amount of glass tile on that wall. Thankfully we had enough and it was in keeping with the style that I am looking for that doubling it up made sense. This way the tile guy didnt have to do a ton of extra work taking it apart, and I get to keep some semblance of the design I wanted.


The kitchen tile work is essentially done, with the exception of a little bit of grouting on the back splash for the vent hood. This is a deail of window opening from the hallway into the kitchen. I had the tile guy put two tiles in the actual space to define where we will be putting the glass insets. I chose to use 1/2" shatterproof tempered glass in this space so there will be no chance of anyone of the kids putting themselves through it if they happened to trip and fall going up the stairs.


Take one last look. This is it, today the stairs will begin to be trimmed out, and they will never look the same. It seems like its been a thousand years since there were no stairs here, and then even the "temporary" stairs that you see here. I will say I am glad that we have waited this long to do the trim on these stairs as they have been beaten up pretty badly in the last three months. Now the problem is going to be keeping them nice once I get them trimmed and then finished this week. I am going to be spending a good deal of time over the weekend getting protective layers down on the floor to do everything we can to avoid any mishaps.


This is the thermostat for the heating in the bathroom floors. When we are all done these will be set and ready to roll at 65-70 degrees all the time. The girls wont ever have to deal with getting out of the bath onto a cold tile floor anymore!


These are accent lights that cant go in until after the drywall is done. I had 9 of these installed in three different places around the house, and they are going to end up being exactly what we want. These lights are gimbaled so Iwill be able to point them at whatever items I am hoping to get a highlight on. One of the main places that I wanted this is on the wall where the TV will be going. This is mainly because TV tends to look better with a light behind it - and its less of a strain on your eyes.


Its hard to make out this color exactly, but this is the color Astor chose for her room. Its a pretty light colored purple on the card that she chose....not as much in person. Its quite a vibrant color in preson, and I am sure that Astor is going to love it.

Stairs are going in right now. Siding is going up on the garage along with soffits and gutters. Quite a few major changes happening in the next day or two. Going to try to get some pictures at lunch today in the daylight so the exterior work can be seen.

Friday, November 12, 2010

Progress on Many Fronts


Things are moving right along at the house. Because so many things are finishing up, its hard to have everyone there working all the time. As a result, I am struggling to get everyone scheduled in a way that allows for the work to be completed in full. Everything seems to be 85% of the way done. At this point we are down to finishes. The tile is going to be a few more days, the painting begins tomorrow, and the wood floors have to be sanded and finished (later next week). On top of that all of that we still have to finish all of the custom work, put in the light fixtures, install all the bathroom vanities and clean up and stain the cement floor in the basement. Lots to do, and its going to be hard to get this finished by the end of the month with the holiday in the middle of all of that.


Here is a shot of the kitchen as it stands now. The 3rd piece of counter top did go in yesterday, and it looks exactly the way I was hoping it might. The tile contractor also got a good amount of the back splash tile in yesterday too. You can see that I chose to use a different tile behind where the vent hood and stove will go. I wanted to try and break up that space a little bit, and it seemed that using a different tile would help do that in combination with the stainless steel appliances that will go there.


The generator is about 75% of the way installed at this point. People's gas is out today connecting the gas line and putting in a meter which should allow me the electrician and plumber to connect the generator to the home's infrastructure. I also had to go out and buy a car battery for this thing as it has to have a way to self start when something goes wrong with Comed's service and it has to kick on. This generator will do a self check 2 times a month to ensure that it works and to give the battery a charge so it doesn't run out of juice. The generator has an automatic system that we will program so it will run at a certain time for each self check - ideally not late at night or early in the morning as I understand its not quiet....


Here is the finished patio area. The forms between the pads of cement have not been taken out yet, but when they are this will be the finished product. You can also see that the windows have been put in the garage and its Tyveked and ready to be sided (which will start on Monday). I am going to be putting some light fixtures on this north wall space to illuminate the patio area. I hope that this will make this the perfect outdoor living space for day or night. It will be nice to have a space that we want to use outdoors for eating and relaxing.


The fence is finally progressing. There have been some fits and starts with the contractor who is doing this work, but I think we might finally be on track to get his work done. I have to say that I think this fence is going to come out almost exactly the way I wanted it to look originally. Now I just need to figure out the best material to put on the ground for the dog run as that's the purpose of this area.

More updates to come this weekend as painting happens, and I get some cleaning done around the space.

Wednesday, November 10, 2010

Confounded Darkness


Lets just say that I am really having a hard time adjusting my photography schedule to the new hours of that its light during the day. I have been so used to getting home, checking in with the family, and running over to the house to take a few pictures before it gets dark. Well......that's not really working out very well for a bunch of the pictures I would like to take (fence, patio, garage). The good news is there are plenty of working lights in the house which is allowing me a modicum amount of pictures.


What is that on the openings? Doors! Funny how that sounds, but its true, after 4 months, there are finally doors on all of the rooms again. That also means that the whole house has trim as well. All of the windows and doors are finished, as well as the baseboard in the whole house. We chose to use a very simple trim, and we are not doing any crown molding at all. I will be much happier with this when the doors and trim are painted as everything it dusty and dirty (and primed yellow) that make things look just a bit off. Don't get me wrong, its a welcome change, I would just like to get all the way to the end result.


I don't think I have talked about this door at all. This is the the only interior door in the entire first floor. One of the main reasons we chose a sliding door here was because it was on such a high traffic area in the hallway to the basement where we will be coming and going constantly. So I decided if we put a sliding door on there it would be less likely that someone got hit with the door, or have to constantly be closing it (opening in wasnt an option with the small size of the bathroom) to keep it out of the way. I ended up purchasing this door from the sliding door company, and while expensive, its a really nice door that works just as it should. I think its the perfect touch for a tiny little powder room, and should help keep it from feeling any smaller then it already is.


This is a very yellow picture of the tile in the master bathroom. Unfortunately the light in here wasnt very good so I wasnt able to get a good picture of just what this tile looks like which is actually white with some silver and gray in it. What you can see from this is: the tile is a 6x24 porcelain and is being laid in a similar "stacked" manner as the girls bathroom, and we have put down floor heating product below the tile. I am pretty happy to have the latter, especially with this bathroom having two exterior walls and the likeliness that these floors will be cold in the winter without the heating element. Its one of the little things in the house that I am really looking forward to.


Last but not least is the progress in the kitchen. As I mentioned a few days ago, we changed our mind on what we were going to use for hte back splash and decided to go with 2x8 white porcelain tile in the kitchen throughout. We are about halfway through the installation of that tile and I really like the look we are getting. Its not going to help the kitchen feel any better, but I think its going to end up right in step with the finishes in the rest of the kitchen. Once the appliances and rest of the counter tops are in, it should look great.

Mostly tile work and some exterior work being done on the house this week. Painting will begin this weekend, and we will be doing a lot of the finishing work like installing bathroom vanities and such next week as well.

Sunday, November 7, 2010

The Little Things


Its easy to look past the little things in the house. The things that at one point seemed to be the most important decision of the day/week, now an afterthought. I was in the house cleaning up today and was thinking about all of the little things that have to be buttoned up in order for this house to end up working efficiently. Whats funny is I think that keeping in front of these little things are what tend to keep me ahead of the curve - for the most part.


The radiant heat is something that I feel like I spent a whole month on back when we were building the infrastructure of the house. The above two pictures are of the manifold that will be the control valve for the water flowing into the radian tubes. The four tubes from the floor connect to the manifold, and the manifold will connect to the combined heating source for the water.

In the case of how to provide the heated water for the radiant system, we chose to use a double use water heater. This will be a 75 gallon water heater that has a separate coil built into the bottom half of the water heater. Inside this separate coil is the water for the radiant tubes. What happens is the water heater automatically heats the water in the radiant coil as a result of keeping the water in the tank warm. Because its very difficult to drain even half a 75 gallon tank with a small house like ours, the coil being in the bottom half should keep the temperature fluctuation in radiant tubing from being too bad - this being the major drawback to this system..you could see some temperature variation. It should be fine, and it makes the most sense from an economical and energy efficiency standpoint.


The panel. Its very fun to photograph, with lots of colors and angles. Its also the hub for all of the power in the whole house. When you look at it closely, its hard to make heads or tails of all the wires and connections. What I do know is that the color of the wire being used relates to what area of the house it was being used in. I most cases a main room or switch will have 5-6 different color wires running through it. Pretty interesting process. Its something that seems so difficult looking at it from the outside and is fairly simple to do when you have the knowledge. Its truly a tradesman that is an electrician.


This isn't so much about the details as much as its about cleaning up the cabinets and making it look the way it should when its done. I decided to take a few swiffer wipes over there to get the static-y dust and grime that had accumulated on the cabinet doors. Poof, the kitchen looks as it should - pristine and new. I am really looking forward to having the floors sanded and finished and the cabinets cleaned....should be exactly what I was hoping for.


Who says there aren't plenty of hard working people out there in this world? The roofers showed up on Sunday to do the roof. I love it. They started work around 9.30am this morning and were finished with the roof by 3pm. I know its not hardest roof in the world, but I just enjoy the fact that someone else is as crazy as I am. As with the house, we chose architectural black shingles and we added a ridge vent for this (there were not vents on the house due to the spray foam) garage to release the heat that will inevitably build in the summers.

Hopefully the siding will be delivered tomorrow morning and the guys can get started on that. I got the Tyvek and other items....I will just have to bring the windows over from the basement of my house so they can put them in.

Cement patio goes in tomorrow, meetings with garage door guy, shower glass & mirror guy, and the architects are coming by to see the house for the first time in a few weeks. Going to be a busy day around the house.

Saturday, November 6, 2010

So Many Things, So Little Time


Its been a few days since I have posted, and in that time quite a bit has been done around the house. Most important of these is the installation of two of the three counter top pieces. As seen above, we have chosen to use CaesarStone counter top as our counter top material for this kitchen. CaesarStone is a manufactured stone counter top that is made of pulverized quartz. Essentially they pulverize the quartz and then reconstitute it to make a solid color counter top. The adhesive agent they use to get the quartz to stick together also makes it stain resistant (but sensitive to heat). Therefore, the color we chose is Pure White, which is essentially solid white. We are confident in the product's ability to stand up to time from a stain resistance standpoint so it will be quite interesting to see how this will go over the long term as we beat on it.


Here is the kitchen with the two slabs installed. We had to take the doors off the sink cabinet as they were not cut properly by the installers (shocker). We chose to have an under mount sink, and a stainless steel farm sink with a single bowl at that. Its pretty simple and refined if you ask me. We looked at quite a few different sinks and in the end we kept coming back to the farm sink. I am really happy with the clean simple lines on the sink in combination with the counter tops and the cabinet colors. I really cant wait to see the who thing assembled with all of the other items (stove, fridge, lights, and back splash) installed. It should look really good.


Here is a shot of the edge I chose for the counter top. We have a half bull nose edge on the granite in our house now and while I like it, it is not ideal for the more contemporary design of the new house. So, I chose to go with a very simple beveled edge on the counter top. There are not a ton of soft corners and edges in the house, so this should be a good way to tie everything together in the kitchen. This shot also gives you a good idea about the junction of the counter and sink in the front as well. We really wanted the counter top to be over mounted on the sink and I am quite happy we did it this way with just the jutted out portion of the sink not covered by the counter top.


Dual purpose shot here. You can see the window openings that have been cut into the garage now that the rough construction on it is complete. I know it might seem like a lot of windows, but I already owned these windows, so they were going in the garage. The other purpose of the shot is to show the patio area that has been prepped to have cement poured on Monday. We are having a sidewalk poured all the way from the back of the property, past the garage entrance door, and right to the basement entrance of the house. From there we will be laying different sized pads of cement from that sidewalk all the way to the east property line where they will be a 10' x 3' pad laid for a grill enclosure (and maybe a smoker) to be built in the spring. We will be leaving some spaces between the pads of concrete where I will put in some pea gravel. This is being done to allow water to run off under these pads and keep the area from flooding.

With the combination of the windows, the high walls of the deck, and the cement patio with the grill, I am hoping the area between the deck and the garage can have a courtyard feel where we can sit outside and enjoy the warm summers. If things work the way I want next spring, I would like to put a pergola over a portion of the space to further define the area as an outdoor living space.


This is the impromptu tile wall. Originally I purchased this tile for the back splash in the kitchen, but I didn't like how dark this tile ended up looking with dark grout - conceptually, I it wasn't actually installed. We were going to use dark grout as white grout doesn't work very well with a high use kitchen. So, out with the glass tile, and in with the white subway tile in the kitchen. Since I owned this (and it couldn't be returned - which I knew when I bought it) it made sense to put this on the wall in the powder room. As it turns out, it looks pretty good, and should really brighten up that tiny little room.


The trim boards, all dressed up and ready to go. This is what we are going to be using around the windows and on the baseboards. This is just flat "1-by" trim. There will be 4" high trim boards on the baseboards, and 2" trim around the doors and windows with no crown molding at all. We chose to go with the simple and clean design and tried to stay away from the gilded look of crown or detailed molding. It is going to take the carpenter the better part of the week to get this all installed. I really want to see the way the do the trim around the windows as it just doesn't seem to be obvious they way they are going to make it all level.


This is the door choice. Its just primed right now, but these are going to be painted white to match the trim in the house. This door is a new style from Masonite. My original plan was to just go with the slab door, but I really liked this new style. Its simple and straightforward, but has a bit of design to it. The funny thing is there is only one door in the first floor, and we are not using this style of door for that door (on the powder room). These doors will be used in the second floor and basement.


The fence is finally progressing. The steel guy who is building this has been ill and having transportation problems since getting all of the posts in the week we agreed to do the fence. The steel has come up with a good idea to use longer boards to make the fence look more uniform. The ones you see above are the "test" boards that he was putting up to show me what its going to look like. He is now treating all of the boards with a cedar deck stain, and then he will be mounting the boards as such. Ironically, I was never 100% sure that we were on the same page design-wise, but we agreed on the basic materials and colors, and it was just a matter of which way the boards were mounted. This is the way that I wanted it to look.


Here is an example of what the finish carpenter is doing in the house. This is a storage area in the main room of the basement. Its going to be handy for all of the stuff a play area should have stored. The carpenter will be doing this, a bench in the mudroom, a bookshelf in the first floor, a bookshelf in the master bedroom, and the front and back doors. So far his craftsmanship looks to be what I was hoping it would be. He is as patient a builder I have seen on the job so far.

Last but not least, the guest shower. This is tile that we have in our house currently, and this makes up the entire shower (floors, ceilings, and walls) in the guest shower. This is all of the tile we are going to be doing in the basement bathroom since we have the heated cement floors in the whole basement. Now its just going to be a matte of getting the heat to the right temperature and finishing the floors in the bathroom with something that will keep you from slipping all over the place on a wet cement floor.

Cement, electrical, finishing the counter tops, finishing the tile, doing all of the trim and doors, siding and roofing the garage, sizing the garage door, measuring for all of the custom glass in the house, choosing the lighting for the garage, designing the back fence, getting the awnings up are all on the agenda for next week. Going to be super busy week coming up.