Tuesday, August 31, 2010

Measure Twice.....


Things you see that undeniably say progress.....This is the view of the side of a large pile of 2x4's that at this point has largely been used for the basement framing. The carpenters started yesterday morning, and were absolutely tearing through the basement.


This is a shot of the southwest corner of the basement where the mudroom area is going to be. On the left side of the photo above will be a bench with cubbies above it, and on the right is a coat closet. Just out of the picture on the left is the basment entrance which will be the main entrance of the home. Because we know how it goes 6 months a year in Chicago with coats, boots, hats, wet clothes etc we decided it would make sense to have everything located where we came and went the most. Once the rough carpentry is done here we will be using the services of a finish carpenter to build the bench and the cubbies custom to my design.


The basement stairs.....finally. We have been waiting for this for 8 weeks. We are not huge fans of the "pie cut" stairs you see before you due to the sharp drop that can happen on the inside of the turns. If you combine that with little kids, and the likliness that we will be using these stairs hundreds of times a week you have a potential disaster. Well, as usual, the carpenter did a fantastic job of turning them in a way that works perfectly. Not only do we not have the precipitous drop on the inside like we were expecting, but he got the bottom half of the stairs to the code required 36" width. This man can flat out measure and cut : )

This is the basement layed out on the floor ready to be framed. Its pretty cool to watch them lay it out on the floor and figure out exactly where everything was going to go. It also helped us figure out pretty quickly that.......


One of the four radiant hoses is in the bathroom instead of running into the mechanical room. Soooooo, this means they are going to have to chisel the floor out around the hose gently to allow the hose to be in the mechanical room instead of in the bathroom. Sigh. In the end its really not that big of a deal, but its frustrating with how hard I fought to keep the floor intact once poured....oh well, at least its not in the middle of the floor in the main room.

Basement should be finished today....major HVAC and plumbing work tomorrow, electrician on Friday.....

Sunday, August 29, 2010

Ready to Roll


The cement has been poured since Thursday and things are pretty much dried out and ready to be framed out. More importantly, we are getting a glimpse at the subtle parts of our new floor. As pictured above, you can see just how much variation there is in a freshly poured floor. The plan is going to be to cover it up with very thin OSB to protect it from things like dropped tool etc that can happen when working on the basement. Once they have the majority of the work done down there, we will pull up the OSB, polish the floors, put down an acid stain, and then polish again. This is one of the features that I am most excited about in this house. We wanted to do this in the original house we were going to build, and we are happy it was able to be done here. I just hope we are as happy about it as we think we will be. Only time is going to tell on that.


The only work that has been done since we poured the floor has been cleaning up the opening of the doorway into the basement. Because we ended up widening the stair area from its original width, there was a bit of a jagged edge on the west side of the door opening. Figuring that it made sense to come as close to centering the door on the stairs as possible, we had a mason come out to cut and tuckpoint the door area. He was in and out in 4hrs on Friday and did great work. This is going to give us a real nice wide 36" entrance door to the basement. Being this is the main entrance in / out of the house, it will be nice to have the widened opening.


Close up of the tuck pointing here. Good old Chicago common brick was used for the foundation walls, and is found under the skim coat on the inside of the walls throughout.

The new stairway in all its glory. I am really happy with this new opening. I think its going to go a long way to making the house look updated from the outside. I am not hoping to distinguish the house from the neighbors so to speak, but I am hoping that the house will appear as though we have thought about all aspects inside and out when re-doing it.

Tomorrow we are going to being all of the framing in the basement, including basement stairs...for the first time in a month or so. By Wednesday, we will have a really good idea about the exact layout of the entire house. By the end of the week, plumbing and HVAC should be done, and the house should be ready for the electrician to come in an do his work.

Friday, August 27, 2010

Its Funny How Things Work Out


One day we are delayed several days as a result of process oriented hiccups. The next day: we jump ahead of that "delay" unexpectedly. Yesterday at lunch I stopped home to check on the progress of the water line and when the city was coming out. Jen had mentioned to me on the phone earlier there had been a cement truck out back. I knew they were going to pour the stairs and the piers for the deck no matter what, but when I arrived home......


The whole floor was poured. Done. Just like that. It was very odd. I was caught completely off guard as it was the last thing I expected to see knowing the water inspection had to happen and the water supply line needed to be inserted in order for this to be done. Apparently the city got out there early, and everything was done at the same time. Pretty great surprise if you ask me. Once I was able to confirm what was going on and that we were in fact OK, it was a nice feeling.
As you can see from the picture above, its one solid surface. The cardboard item on the left side is the drain tile basin where the sump pump will do its work, and all of the other drains and stacks are above. My favorite part of all of this is the 7-11 cup that is blocking the floor drain in the mechanical room from being filled with cement. Who needs high tech when you have a Sev right around the corner??


As I mentioned above, the stairs were also poured yesterday along with the basement. This is such a nice change of pace from the previous stairs that were there. Not only are these wider, but they are smooth, straight, and they have a legit floor drain at the bottom that should help us keep from having pooling water at the bottom of the stairs when we get our Chicago deluge's.
What's not pictured here is the coil of radiant tubing that is sitting just out of camera range waiting to be stored under the deck for now.


Here is a closeup of the "tap" they did on the city water main. As you can see everything is copper. Instead of having a 3/4" in diameter water supply line to the house (as we have now at our current house) we will double that and have 1 1/2" supply line. The thought of doing two plumbing related things at once in the house is enough to make me want to move in right now.


Just a shot of the house as it is now. Looking at this picture compared to the one just one day before its crazy to think how much was done in just 24hrs. While it was really only one thing that was taken care of, the trench was dug, supply line laid, and filled back in in the span of two days. Pretty impressive if you ask me. There is still a massive trench in the street that is going to have to be filled back in, but that will be done today and the street will be back to its former self.

Today there wont be much work going on as we are going to let the basement cure over the weekend to ensure its ready for the pounding its going to take on Monday when HVAC, Carpenter, and plumber are all working away in there.

Wednesday, August 25, 2010

False Start


Another day. Another pile of dirt in front of the house. This time its coming from digging the trench for the new water service from the street to the house. Essentially they have to have all of the ground open and ready to roll when the city shows up to tap the main and approve the exterior underground plumbing.


The trench in all its glory. The city requires that the water service go into the building within 5 ft of the original location of the water service. In this case, that means we have to go the east side of the foundation to not have the water moving into the middle of the basement wall.


This is the view of the hole that actually goes under the foundation. The plumbers will run a copper pipe up under the foundation and into the floor of the basement just inside the foundation wall / footing. This is also the reason the cement floor wasnt poured today. Because the city has to see the entire supply line from the tap to the house, we cannot pour the cement until they have seen it all and know its correct.


Here is a shot of one of the gambles I am taking on the property. The architect and I (mostly the architect) are currently working with the city in earnest to get the design of the 1.5 story garage approved so we can have "attic" storage over the garage. If we are able to accomplish this, then we are going to put radiant heat in the garage floor. Since there was a chance we might do that, I decided to have a separate loop of exterior radiant tubing - notice the white color differs from the black used in the interior - in the event that we could run it out to the garage and have the sidewalk / stairs warmed. So, because they have to run in a closed loop system we were really having a hard time coming up with a way to run the tubing without it destroyed through the rest o the construction process. In the end I came up with the idea of running enough tubing to get to the garage so it could be a closed loop and leaving it under the deck that will be built next week until we know whats going on with the garage. Would be pretty awesome to not have any shoveling to do on the walkway out back. One can dream.

We shall see how it goes with the city tomorrow. If all goes well we can pour the floor on Friday and let it cure over the weekend that will leave us with a bonanza of mechanical work next week.

Tuesday, August 24, 2010


Here it is. The fully prepped basement. We are ready to pour cement starting this morning. The picture above details what it looks like to have the radiant tubing fastened to the wire mesh and ready to have cement poured over it. All that is left to do this morning before they pour the cement is to put the angled PVC on the edge of the foundation to ensure any water coming through the foundation runs into the drain tile.


You can see here that the hosing is clipped to the wire mesh that was put down. The clips are every few feet or so, and ensure that the tubing doesnt get moved out of place as they put the heavy loads of concrete down on top of it. Whats interesting is that each set of tubes (there are two sets) are isolated solid systems. There is no coupling or joints in this hosing. They are closed loops. This is done to ensure no possibility of leaks inside the foundation as that would not be good. It took the HVAC guy's the majority of the day to lay down the tubing so we could start today.

This is a closeup of the insulation thats below the radiant tubing and the cement will be poured on. As I said before, this is a newer product, so we are really on the leading edge of fully utilizing this technology from a "green" standpoint. We are hoping this is going to keep us from using the furnace in the lower levels of the house as a result of the warmth the floor should create for our home - this should drive long term energy savings as well (crossing fingers).


Yup, this is up for the work they are doing on the water service for our house. This is a a new "requirement" from the city on the water service upgrade. The city deemed that we had too many fixtures requiring water, so we had to upgrade the size of the supply line to the house from the city's water main. In this case, the location of the main servicing our house actually runs on the other side of the street. In the past this would have been taken care of by digging a hole on the other side of the street, boring under the street from that location to my yard, then digging a commensurate hole in our yard to connect them with the new 1.5 inch in diameter (currently .75") pipe. Well....the city no longer trusts that this is being done properly, so they require that they have full visibility of the pipe from connection of the water main, to the property's foundation wall. This means......

Ripping a monster trench right across the street. Yesterday, the plumbing company cut the street, jackhammered out the pavement and lower layers of support, and dug out all of the dirt. The water line is actually just a foot this way -> so they access it from this side, run a new pipe to the connection, and the city comes out to "tap" the main line for them as they are the only ones allowed to access the water main (makes sense to me). Once this is done, they plumbing company will dig a trench all the way to the house (under the city sidewalk) and to the foundation line where they will bring it into the house. Once they have done this, the city will come back out to inspect the entire line to ensure its done properly and the plumbing company can close everything up.

It was quite nice yesterday at lunch when I came home and the street was closed off....no traffic made things very quiet and I felt like we had the street to ourselves while they were working on the water line. Very nice change of pace for our semi-busy street.

Monday, August 23, 2010

"Monday" is Universal


First and last time I will use this. Promise. There were so many things planned for today: radiant tubing going in place, floor drain in the stair well, putting in the forms for the stairs, digging the pilings for the deck, and then potentially filling the post holes and pouring the floor.

None of it happened. Not one thing. Its just the way things go. With this day specifically, once one thing wasnt happening (tubing), most of the rest essentially wasnt going to happen.

So, we will start at it again tomorrow at a slower pace....and see what happens.

Stage 2 of the Basement Floor


This is the state of the basement floor as of this morning. Yesterday, the insulation and rolled mesh were put down covering the floor. I think I have covered this before, but the point of the insulation is to deflect the heat from the radiant tubing back up into the cement instead of losing it out the bottom of the floor into the stone and dirt below. The mesh is layed down for two reasons: it binds the cement as one cohesive unit, and it gives the radiant guys something to hook the tubing to.


A different look at the basement. You can see in the foreground there is a large hole in the ground that hasnt been filled with stone. This is going to be an area called a thickened slab that is poured like a footing, but is just poured at the time the floor is poured. This is being done where the base of the stairs is, and will give an additional foot of support for where the base of the stairs ends up being located.

The second part of the pour, which may or may not happen today, will be the back stairs. When we realised that we were going to have to rip these out for a new drain and to re-support the back wall, we decided to widen them. Once the slab in the basement is poured, they will start with the castings for the stairs. We are going to run radiant tubes in the stairs as an individual unit from the basement and "stub" them towards the garage.

The thinking here is if we get the 2nd story of the garage approved, then we are going to want radiant in the garage to heat the area and at that point we will run it from the garage, out the sidewalk, and into the stairs. The reason the back stairs cannot be connected to the basement is due to exterior systems running and anti-freeze mixture that you dont run inside your house. Lets hope we get the chance to use these tubes as this will mean far less shoveling in the winters!


This is a shot of some of the plumbing supplies currently layed out in the front room on the first floor. All of the piping and joints are ready to be set in their places now that the holes have been bored in the appropriate places for locations of drains etc.

Notice the siding is painted grey at the bottom now? Thats because I went and put two thick coats of Dry-Lock on it. Dry Lock is what people use to seal basement walls when they leakage etc. I decided to do this since this wall was going to sit inside the deck area and could get a bunch of water on it from the slats in the porch floor. I figured if I had the opportunity to do it, I might as well just do one more thing to help prevent issues down the road.

Radiant tubing is going in this morning. There is a possibility that they will begin laying the slab this afternoon as well. The plumber will also be working at the house today on getting the rough plumbing up and running as well.

Saturday, August 21, 2010

Step 1 of Basement Floor


Shovel gravel from truck into wheelbarrow, move to basement, dump, repeat. Thats what was going on in the basement today. The large yellow truck had just the right amount of gravel in it, and the basement has been filled and compacted. The guys use a gas powered compression machine (not pictured) and a laser level to get things relatively close for the cement.


A broader shot of the compacted basement. On the right is the rolls of Mylar coated insulation that we will be putting down on top of the vapor barrier to reflect the heat from the radiant heat back into the cement to help conserve energy further. This is a newer product that is really helping pushing the efficiency of the radiant system. We will also be putting down L shaped PVC flashing that will go against the walls and under the vapor barrier. This will direct any seepage related water into the drain tile, instead of onto the drywall or onto the cement.


This is a little closer look at the underground plumbing that is left stubbed above the floor. Pictured here are the floors drains for the mechanical room and shower, the toiled, washer, and sink drains, and the second stack that will be servicing the master bathroom. The tiny one in the background is the main stack that will be providing an exit for the girls bathroom and the powder room. Its pretty cool to stand there and see it all laid out ready to roll. Tomorrow the rest of the layering will go down so the HVAC sub will be doing the tubing for the radiant. Tuesday or Wednesday we will have large amounts of cement poured into the basement (mildly geeked)


Southeast corner of the house. these are the two windows that will be inside the fence. These are nice simple windows that are going to let in the most light because they dont have the double hung middle on it. This will be necessary on this side due the reduced light coming from the blockage of the fence and the deck. I am guessing it will make the bathroom down there seem less dark.

Friday, August 20, 2010

Preview


The view from the backyard. This would be the dump truck which possesses all of the gravel that will be put into the basement in the next few days. Its quite a bit of gravel. Whats better is that is a great older model ford dump truck thats just parked in my backyard. I think they are going to start on this tomorrow, which means we should be laying concrete in the basement by Tues/Wed if all goes well. This will then allow us to begin framing and mechanical installation in the basement.


I am quite excited to see how the radiant process works. I am going have to take a few hours off work several days next week to watch the process of laying down the tube and pouring the floor. I am really interested to see it all play out.


The last pieces of the demo came down on Thursday with the walls and framework between the main living space and the library / sitting room (we are honestly not sure what to call it) . What you see in front of you is all of the rough plumbing supplies that were delivered today. Our plumber (who is awesome) has already cut all of the holes in the necessary to place the PVC piping in place; now its just a matter of putting it in. The plumber says if he is the new floor is in an cured by the middle of the week next week, then he will be done by Friday. That will mean we are left for only the plumbing finishes which would be the installation of all of the faucets.


Thursday, August 19, 2010

One Day Later....Windows!


The Windows are officially installed in the house. I have to say that its a relief the windows and the window opening's fit together with a minimum amount of issues. They installed the windows, shimmed them, sealed them and nailed them in all in one day.


The three layers of protection for the windows: Hardie Wrap, DuPont Flex Wrap for the window sill, and plastic sill seat of the window. Once you add in the caulking, the second layer of Hardie wrap to the window, and the seam tape for the windows on the exterior, we will have a fully sealed envelope around the house. We are hoping that once we add in the spray foam insulation to the interior, our home should be really energy efficient.


2129 - 10. Thats the magic number. In order to order the pre-painted PVC trim I had to choose a version of black that comes closest to matching the window's color. You would think this would be a no-brainer, but it wasnt. I stopped at Benjamin Moore (thats the PVC company's choice) and brought home 6 different shades of black. Two of them were very close together. In the end, Midnight Dream won out and will be the double coat of paint on the trim I am ordering from the supply house tomorrow.


Yet another layer of the onion peeled away. This is the condition of the outside of the foundation on the west side of the house. The previous owner had just put a flimsy aluminum plate over it and secured it into the seam between the house and the cement sidewalk. Not the ideal solution. We will be having this tuck pointed early next week to ensure the house is as solid on the outside as possible.

Tomorrow we start with the gravel in the basement and the rough plumbing in the rest of the house. Things are really going to move fast for the next two weeks as things begin to solidify in the basement.

Wednesday, August 18, 2010

Prep day and Another Layer


Since the windows are due to be delivered this morning, yesterday was prep day at the house. Both the carpenter and the siding installer spent the day working on the window openings for the house.

As you can see from the shot above, all of the windows have been taken out and new headers and window jam lumber. That is followed up with a layer of wrap that helps seal the windows to the opening.


Here are the new windows in the kitchen. We are going to have lots of great light in there from all but one side of the house. If you look back at the old pictures you can see that ther was one awkward large window on the south wall, and one off-center window on the west wall. Now we have added windows to frame the hood for the stove and a window that is fairly well centered on the wall, and will be centered on the sink.


This is just a shot of the little things that have to be done on the exterior of the house to finish sealing things up. These holes have been drilled in the house over the previous years for god knows what. These three holes and a trap door like entrance were all under the porch. I am guessing that like everything else the owners decided to take the easy way out for whatever addition item they were putting in the house. You can see from the hole on the right that these are filled with wood pegs of sort to attempt to keep the outside temperatures from affecting the house.....didnt really do the job since it was really cold in that basement this past winter.

The windows are going in today. The plumber starts all of his rough plumbing tomorrow. The gravel is going into the basement tomorrow, and we should be starting on the radiant heat and pouring the new floor sometime the middle of next week.

More updates to come

Monday, August 16, 2010

The Beam


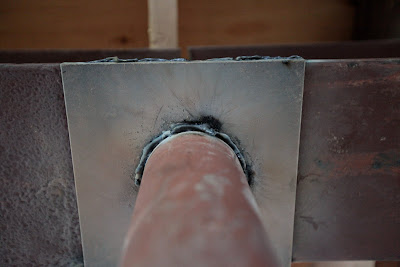
A whole week of iron working and a whole weekend of toiling and we have two steel beams in place in the basement. This means with the combination of the re-built roof and the soon to be re-built front porch, this house's framework is as solid as a rock. The above picture is a close up of the welded seam at the junction of the two beams.


Here is the full span of the beams. Both beams are the same length (16ft), they are 8" high, weigh over 600lbs each, and are supported in three places by 3" steel posts. This beam is the core backbone of the house, and is supporting all of the weight of the first floor (and beyond). The guys from the steel company spent a majority of the first day re-supporting the house so they could replace the wood beam that was acting as the main support of the house. They did this by deflecting much of the support out into the floor of the house from the central point with 2x4's nailed into the walls and support of the house.


Junction of the two beams. As you can see, they did a great job putting it almost exactly in the middle of the plate. I am still not sure how the six guys there yesterday were able to lift this thing up on top of the plate once it was in place, but they did.


Closeup of the junction of the post, plate, and beam. I have to say, all in all I wasn't really sure what to expect from the installation process. I frankly had no idea how they were going to take the old beam out and put the new beam in without severely compromising the structure of the house. Its not like you can do the old quick swap where you just change them out. I kept stopping by the house to see what they were doing because I just couldn't figure out in my head how they were going to do it. Now, having seen how they did it, it makes total sense. I am not saying that I think I could do it, but I see how it works, and how much of the installation cost really relates to the backup support of the house as it is for the installation of the beam.


Ahhhh....The Onion


Well, here is another case of you never know what you have until you start to strip things down. We knew from the beginning that the support posts for the porch were not on cement pilings the way they are required by code. So, the plan was to cut out the corners of the posts, support the porch temporarily, pour the pilings, then affix a new section of the post to the piling and the old post. Simple enough. The plan was to take off the fascia of the porch leave the frame, and re-work the rest of the porch to make it work.

As you can see from above, thats not what ended up happening. What happened was this - as the carpenters started to peel away the fascia, it was found that there were no corner support posts for the porch. Either they had rotted away inside the wood capping that was put on, or they were never there in the first place. No matter which way you slice it, we basically have to rip the whole porch down and start over. We are lucky in the sense that we will not have to re-support the deck, as that would have been really expensive, but everything else is going to have to start from scratch.....starting today.


These are the newly laid pilings. The sonotubes from Menards are 12" in diameter and 42" in the ground. This helps build a solid foundation for the posts that have to hold up to 100lbs per square feet of weight according to Chicago building code. When the carpenter starts to work on these he will put metal cleats on the footings and then nail the new 6x6 supports to the cleats.


Next up on the fun of peeling the onion is the back support wall on the east side of the house. I didnt take a picture of what this looked like beforehand, but lets just say it wasnt good. You can see where the temporary support is, and how the floors seems to stick out from the back of the house. Well, at some point in the history of this home the owner at that time decided to move the back of this wall out, and built a second supporting wall. Whatever lumber they used, its apparent they didnt treat it or seal it at all. When the carpenter got to it, the main support posts were rotted and barely supporting the structure. So.......we had to rip it apart and support it correctly. Guess what that means?? More concrete support for the back wall of the house.


The next bit of cement work that we had done while the cement truck was out on Friday was the rear stair area. This wing wall had to be re-done now because we had to re-support the back wall and the west support of that back wall sits on this wing wall. We had another piling put in on the east side for support as well, and now that these are dry, the carpenter will resume finishing the back of this structure as well.


Something is finished! The roof, it was finished on Thursday afternoon once the carpenter was able to re-connect the front part of the roof to the new ridge that was built to support the roof. Once that was done, the roofers took little more then 5 hours to get things completely shingled and get out of there. There was a heck of a mess inside the house from when they stripped the roof off (cedar shake shingles on the bottom) but now everything is all neat and tidy and ready to be flashed and insulated.

The steel beam wetn in over the weekend as well. I will have some pictures of that up tomorrow.

Today is correct the front porch and back of the house day. Also, IKEA is coming out to measure the kitchen to confirm our layout.