Monday, October 11, 2010

Phase III Begins

I am sort of creating these phases in my head, but it seems logical enough so I am going to continue on with it. Phase I - de-construction and re-construction of the frame of the home. Phase II - rough mechanical development of the home. Phase III - the finishes of the home. So Phase II was finished on Friday with the installation of the insuation being complete.


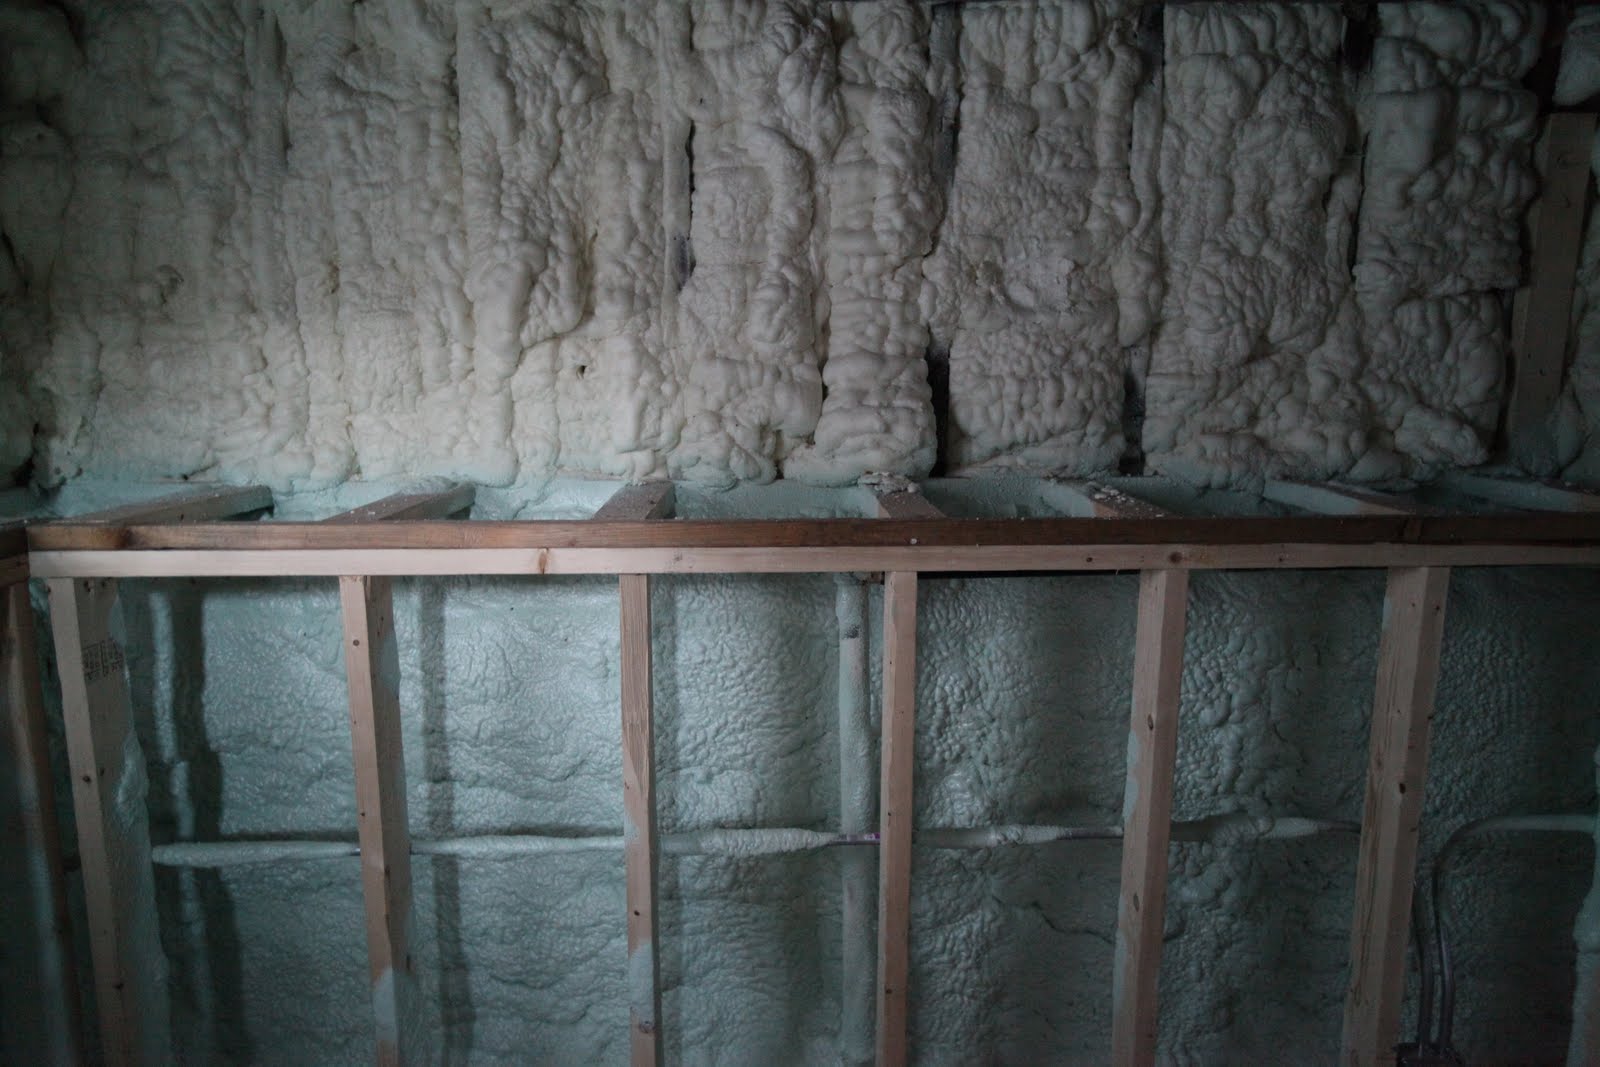
The insulation is finished and cleaned up. The insulation guys did a great job of filling all the spaces, joints, cracks, and seams where air might infiltrate the home. Above is a good example fo that. There was some space between the main stack (plumbing drain) that was set just outside of the wall space yet they still filled the entire space between the stack and wall. This is done to ensure the stack is not effected by exterior temperatures.
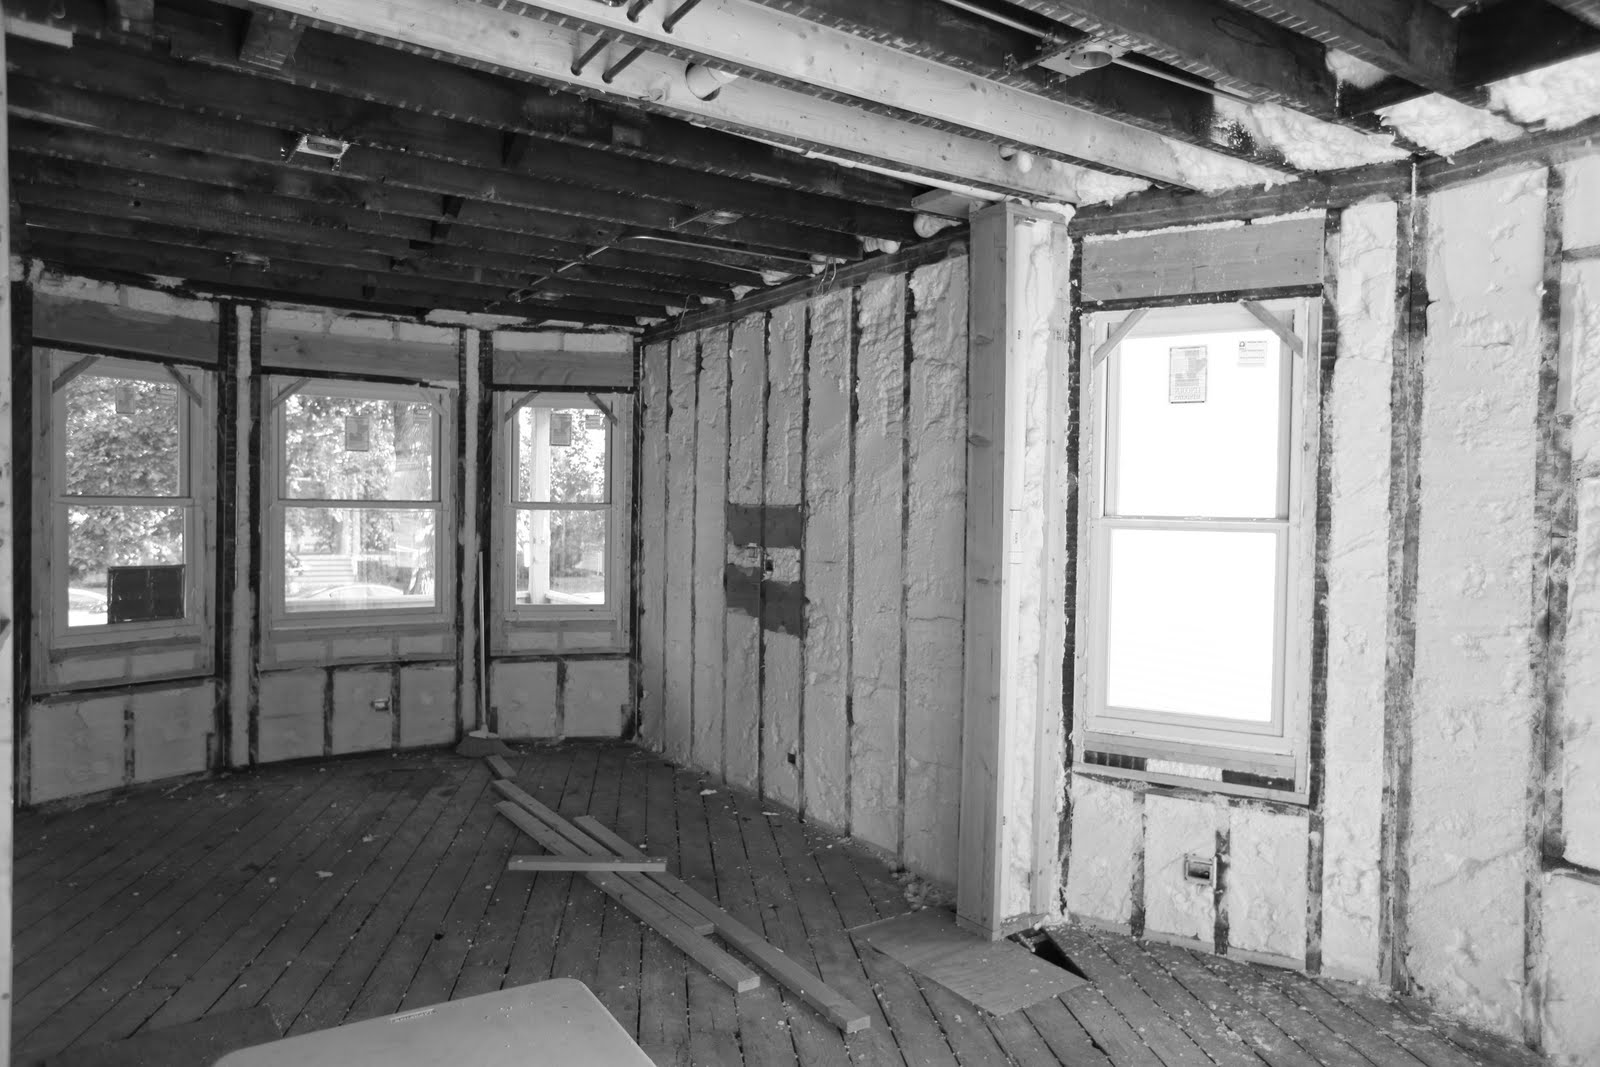


Here is a shot of the east/north wall of the first floor. As you can see, everything is shaved and cleaned up (for the most part) from the insulators perspective. This has the walls prepped and ready to be drywalled starting today. I went through yesterday one last time to try and get things as cleaned up as possible for the drywall laborers. I took out another 50 nails/screws that I missed along with an electrical box that had made it all the way through the process as well. I am very curious to see if the drywallers find this space more or less conducive to doing their work then a normal rehab. I have no idea which way that will go.


One last shot of the insulation in the ceiling. This gives a better perspective of the depth of the insuation that was put in the master bedroom area. Because we re-built the entire back half of the roof, we dont have joist space nearly as full as the front half of the house. This is due to the back half being built with 2x10's instead of the 2x6's that are up front. In the front half, you can't even see the ceiling joists there is so much foam in there. The insulator said we are getting somewhere in the range of R70 from this ceiling now that its done. In addition to that insulation, all of the ductwork is insulated as well. This should limit the amount of heating / cooling loss in the attic area with the 2nd floor furnace. Pretty cool stuff.


It's been a while since I updated with some pictures of the house in total. Is hard to tell here, but we are basically done with the major work for the exterior of the house. We will need to put in a ceiling on the front porch and extend the fascia board around the top of the porch where it meets the gutter and soffit. Once that is done all we will have to do is stain the deck and put up the blocking below the porch to keep a majority of the elements out.

One thing that will be changing massively is the front door. We will be taking out the current door and putting in a custom designed door that one of my friends is construction from scratch. This is going to be a nice focal point of the house, and should help tie everything together better then the brown front door that sticks out like a sore thumb right now.


Its really hard to get a good shot of the back of the house. This is due in part to the height of the house from the deck, and the fortress like nature of the dock and how it blocks the back of the house being shot in full from the ground. You will notice that some of the little things like vents and lighting mounts are being added to the house. These are pretty much done, but we are still adding things like canopies and duct vents for fans etc. The most recent addition is the duct vent for the stove hood. The HVAC guy did a great job choosing one that fits very well with the design scheme of the house.

Drywall is being boomed into the house as we speak. There will be some great pictures to be had for the next few days, then it will be next to no progress for a week while they tape and sand.

Friday, October 8, 2010

Why Green?


Why indeed? Over the course of the last three years we have been on a home design odyssey of sorts. While going through the process of designing a house, not building it, then designing a different house in the span of 2yrs I never really stopped thinking about the first house in terms of materials and designs. Once you starting paying attention to details or ads in magazines or things on blogs you just cant turn it off.

At the same time, seeing some of the things we were talking about doing in iteration #1 of 3935 Eddy st. spurred the GC to learn more about those products. He recognized there was a distinct movement towards these products, and sought out providers in the area to understand more. The spray foam insulation came directly from his urging to use the product. He suggested it for two reasons: it was incredibly efficient, and it would help dampen sound. Ed knew we were trying to be as energy efficient as possible, and knew this was the foundation to that.


So here we are. This is the aftermath of one of the insulators attacking the kitchen wall with a large reciprocating knife that shaved the walls. It makes sense this would be the way to ensure a level surface, but its incredibly messy and time consuming. I know there isnt a better way to do it, but its a tedious process that takes as much or more time as applying the spray foam in the first place. Great news is you can pack huge bags full of the stuff and they still dont way anything; making it way easier to collect and dispose of.


Here is the finished and cleaned up product. This is the east wall of the master bedroom. When you are standing there looking at this finished, it just feels solid. Part of it is how dampened the sound is compared to our current location - the juxtaposition between the two houses noise-wise is greater from our house with the alley noise - but nonetheless better. I really like the way the product filled the space, and now truly know how solid a home we have built.


A close up of the shaved wall. You can see the inconsistencies in it. The variance and inconsistencies are what the product is defined by so its to be expected, but its interesting to see just how much of the space has been taken up by foam. Once you start to tally up the layers of defense this house has to the outside elements, its truly going to be the opposite of current home: quiet and consistently one temperature.


Here is a picture of the closed cell spray foam we are using on the foundation wall. Closed cell insulation is both a vapor and water barrier. If there is seepage from the foundation, it will move down through the space in between the foam and the wall. If you think back, we put the PVC "collar" under the cement slab in the basement to direct water on the wall down into the drain tile, and away from the walls. This dovetails in with that and helps to direct the water directly into this channel, and thereby, the drain til. The rest of the house is done with open cell spray foam. Open cell is a vapor barrier only. Both products are great, but the closed cell is typically only used on a masonry wall, and typically just in a basement.

They insulators finished yesterday and left the house just slightly worse for the wear. There will be 225 sheets of drywall delivered to the house on Monday. All of the drywall should be hung by Thursday, and could be finished with taping and sanding by the end of the following week. That means the wood floors could be in by the end of the month, and then its just on to the tile and cabinets. We are doing really well from a timing perspective. I think there is a chance we can be into the house by Thanksgiving. We shall see.

Still have to address the garage issue, which I will do soon. Its a plaguing topic.

Thursday, October 7, 2010

Spray Foam Madness!!


Spray Foam!! Its everywhere!! Run for your lives before it consumes you!! Sorry, it just seems as though the spray foam is something straight out of an 80's horror movie. Especially once I saw the way the foam goes on and expands to its final state, it does truly seem alive. Its really impressive to watch the way it is applied and settles.


I just posted a picture of this space a few days ago, and you can see just how thick a layer of spray foam was applied to the roof in these spaces. To give some perspective, the depth of the spaces is roughly 9" and is looking pretty full. The goal was to put 6" of spray foam in the joist spaces, and that would give and R factor of something like 70. Typically roll in fiberglass insulation in this space would have an R factor of 18!! Most of the extra R factoring in the spray foam comes from the fact that its an insulator and a vapor barrier at the same time. The typical fiberglass insulation that goes into the walls does not have a vapor barrier built in - you have to put plastic in around the inside of the exterior walls to get the effect (and not at successful) of the spray foam. This is as green as it comes from an energy efficiency perspective.


Here it is up close. Its very deceiving looking foam. It looks somewhat soft and squishy, but in truth its quite firm and feels very much like the material a surfboard or boogie board is made of. Its pretty cool stuff. One of the secondary benefits of this product is its sound deadening qualities. Something I noticed immediately when walking in yesterday evening was how quiet it had become in the house. With the ambient noise decibel level in the city being as high as it is, its great to take the edge off with this foam.


One of the things that was included in the insulation package is a fire retardant caulk that is applied around all of the openings that were drilled into the frame. This caulk is meant to keep a fire contained in the event that one should start in the floor below. By closing off the open spaces around pipes and drains it helps dampen the fire's ability to spread through open spaces and makes it harder to a fire to spread too quickly for fire detectors to give adequate warning. Its a very nice little thing to be able to add to the infrastructure.


We did get speaker wire and cat6e wiring into certain spots of the house the day before the insulators started. I will talk more about this down the road a bit, but this was an important part of the re-building process for me. It is going to be great to connect the house in this manner.

Tuesday, October 5, 2010

Full Steam Ahead


Thats what went next to the inspection reports from the city for the plumbing, electrical, and rough carpentry. Passed with no issues (save one which I will not talk about) and we are ready to move on to one of the most pivotal days of the entire process: the day before we close the walls. What we have left for today: Stringing the walls with CAT6E, Speaker wire, Plumbing chase for first second floor electronics as well as the venting for the water heater out of the house as well as venting the hood for the stove. All of this has to be done today.

Its now or never. If something is left out there will be two choices: pay to open the drywall and cut out insulation and re-do both, or leave it without whatever it is that was left out. Its funny how months and months and months of work comes down to this. So, after going through it yetserday with Jen, I will go through it again today with the GC, Electrician, Plumber, and HVAC person to make sure we have crossed all T's and dotted all the I's. The real question ends up being, what are we going to forget, and are we going to be able to live with it.

I will be taking some pictures of the finished product this afternoon, but it wont be much different then it is now.

Sunday, October 3, 2010

A Vertiable Smorgasboard of Pictures

We are rapidly approaching closing up the walls in the house, so I needed to go through and document as much of the infrastructure with my camera as I could. This way, should we have any issues in the walls, we have a pretty good idea what we are up against, and why. Instead of spending a ton of time talking about each one, I am going to put a small caption for each photo and let that be it.

We have three inspections today, and if that goes well, we will be doing the insulation the middle part of the week, and be putting up drywall by the end of the week. That means we could have finished painted walls by the end of the month. Crazy.


Stairs going up in the basement.


The main wall of the downstairs living area


Shot into the bathroom / mechanical room in the basement


Interior of the bathroom.


Laundry room.


Main part of first floor looking south


North face of kitchen wall looking up at stairs going to second floor.


South / West walls of kitchen.


Looking north from the main room.


East wall of the living room.


Windown wall at landing of stairs going to second floor.

Stairway looking down to landing.


Master closet / entrance to the master bath.


Second floor furance set in the attic.


Last but not least is the railing / wall in the second floor. This is actually new to the house as of Saturday as we kept forgetting to have it put in. We are now officially caught up on framing with very little left to do before the inspectors show up today. Once they are done we should be able to finish up a few things and get the walls closed up.


Thursday, September 30, 2010

On Hiatus.....Sort Of


Its been a sparse week for posting. That is partly due to me being out of town, and partly due to much of the progress happening at the house is not all that quantifiable. I guess I could post some pictures of the massive pile of debris that I piled into the dumpster, or the completely cleaned up house at the end of my 4hr process on Sunday. However its not all that fun, and surely wouldn't be new to this space. What is new and fun is taking pictures of the infrastructure of the house in the most abstract way possible. There are going to be some quiet days in the next week while we get everything finished up on the mechanical portion of things and get the house inspected for electrical, plumbing, and rough carpentry. Once those are done and approved, then we can move on to spray foam insulation later next week.

I find the electrical conduit in the house quite appealing from a photography perspective. Part of it is the "speckled" look that you get on a black and white photo from the way the steel is anodized....the other part of it is the smooth way its bent into the contours needed to snake its way around the house. Whats really impressive is watching the guys manipulate this stuff into the shape they need to get it crammed into the wall spaces. The equipment that is used is simple and efficient allowing the electricians to really move quickly. This is necessary with the conduit being required in the city of Chicago....very few other places in the US require it in this way.


Here is a good example of everything thats going on in the wall spaces. In the above shot there is electrical conduit, copper water supply line, pvc drain tile, and simple electric wiring for the security system. This is by no means the busiest wall space in the house either and is more of a representation of the average wall space in the central portion of the house. Once we add in the cable, HDMI, and speaker wire, the wall spaces are going to be full of mechanicals. In certain places the wall spaces are so full that we are going to take pictures and measure the locations of piping and other items to prevent the carpenter from screwing something into the wrong place once the walls are closed up. This is also something that will help us down the road with either remodeling or if we were to move and sold the home to someone else. Have a good "map" of the way mechanicals are laid out in a wall space, while a bit egregious, is something that I will be glad I did down the road.

My hope was to be putting up dry wall next week. So far that is not looking to be the case. That puts us into the following week which means we will be lucky to have the walls closed up, spackled, and primed by the end of the month.

Saturday, September 25, 2010

Rounding the Corner

Here is the first pass at the garage design as proposed by the gents over at HPZS. They have been working with the department of buildings to get the framework for an attic space over the garage. There were successful in helping the city understand that we have a need for dry storage space over the garage due to how much of the space in the home is dedicated to living space. As you can see, the design matches the Dutch Colonial design of the house, and fits right in with all of the homes in the neighborhood. We think this is very important as many of our neighbors to the rear area going to have to deal with looking at whatever we build for years to come. Might as well have it be in keeping with the rest of the design of the neighborhood and not have it stick out like sore thumb.


Here is the layout as proposed. Joe and Gary have done a good job of laying out the second floor in a way to maximize the space in the attic with full headroom (7' or over finished). Furthermore, there are some really nice nooks etc that will prove useful long term. I like the way the second floor and first floor entrances are separated. We plan on storing things like off season clothes, coats, and holiday decorations. With the first and second floors not sharing a technical hallway, this should keep some of the garage smells contained in the first floor.


This is the way the site will layout with the garage on it. One of the biggest things to be decided is how to do the hardscape around both sets of stairs near the house, and the doorways for the garage. We have decided that we will not have any grass in the backyard. Most of the good summer sun comes from the direct east and northeast which is going to leave the "yard" space (that which is not house, deck or garage and is behind the house) with very little consistent sun in the first half of the day. Having this scenario with the east yard of our current home, I think it will be a constant battle trying to keep grass growing. I have an idea in my head of how this is going to look next spring when we get started on the landscaping.


I just wanted to point out a few of the things going on around the house that have not come up to this point that I like. This is a shot of the 4" recessed light (or "can") we are putting in the first floor of the house. The standard recessed light used in residences is a 6" can, so this gives the house a distinctly different look. Part of what the smaller light means is a smaller foot print of light emitted towards the floor. This makes things especially nice for dimming.


I just posted this picture because I have been thinking a lot about how intense the infrastructure of the house has become. I was walking through there this morning just taking in all the work that has been done. Much of the current mechanical work goes a bit under the radar as a result of there being little outward change (other then sawdust and scrap). I also noticed three or four things that need to be changed around a bit as well. Its really hard to keep all of it in front of you when you are constantly working to improve the design and layout.

This week should show the end of plumbing, electrical, and rough framing with inspections for each. Once that is done and the city has signed off, we will be able to start with the spray foam insulation and then the drywall. I hope we will be putting up drywall the first full week in October.