Thursday, October 28, 2010

Kitchen Cabinets and Garage Foundations


The IKEA installation crew finished things up on Thursday afternoon. While it was not the most fun process in the world, the end result was very good....and that's all that matters frankly. The main problem with the IKEA installation crew is they help you design the kitchen, but they dont buy the products for you. So, when you want to buy the kitchen you have actually go to IKEA to do it. Well, there are three different ways to get to each finished look and the IKEA salesperson's idea of what should be used to get the desired look definitely was not the same as the one from in the installer. As a result, I had a lot of conversations with the installers about how to get the look that we were looking for by using a process or a product that was not their preferred method. It was just annoying more then anything else as I was once again in the middle of a "spat" between whats "right" and what works.

As you can see from the picture above, the Abstrakt gray cabinets have a high gloss to them, and they look much lighter with normal light then they might have in previous pictures (or the next one). They are quite dirty as a result of the film protecting the cabinets creating a static surface that just attracts the dust like crazy. At some point this week I am going to around to wiping them down, but I would guess I want to wait until the counter and back splash are in as well.


Here is the west wall of the kitchen. The flipper cabinets are now fully assembled and covered with the cabinet material on the sides. There will be a 33" stainless steel farm sink set into the cabinets in the middle that are lower then the rest. There will be a chrome single pull faucet that mounts into the counter top behind the sink. With our light colored back splash it should keep the kitchen night and light colored despite the darker cabinets.


We added this feature pretty late in the design of the kitchen - mainly at the suggestion of the IKEA designer. This is a pull out pantry. While we really didn't need to have all of the space, but we decided that this added enough value to merit taking up the counter space we gave up when we put this in. All of the dry food in the house can be stored here and in the cabinets above the fridge. That means that the rest of the kitchen will be left for the utensils, pots & pans, and daily dishware. We are going to have more space then we know what to do with in this kitchen when we are settled.


This is the prepped pad for the garage. This was done on Thursday, and the cement was poured on Friday to set over the weekend so the carpenter can start next week. As you can see, the forms are laid on top of the ground level that existed previously. This is a result of having to slope the garage floor towards the alley on a 3" grade. This means that we will have a step or two coming down out of the garage to the sidewalk that leads to the deck and the door to the basement. I am not super pleased about that being the case, but there really isn't anything we can do about it as we don't want the garage floor level or sloping the opposite way and we obviously cannot change the height of the alley relative to the house.


We are starting to put up the light fixtures in and outside of the house. I ordered this exterior light to go over the back door under the awning that should go up in the next week or so. This light has an aluminum frame and is impervious to water as a sealed system. It also has a light sensor that will turn the light on / off with the daylight so we use it at the right times of the day.

I ordered over half of the lights from one store, and those will be delivered on Monday, I have all of the other lights in the basement already. The tiling will continue next week along with the kitchen counter tops and back splash, the basement shower tiling, and the electrician will continue putting up the lights that will not have to be painted around since the ceiling has already been painted.

Hopefully the frame of the garage will be up by Friday as well.

Its not big, but its really functional......


Its happening so swiftly at this point that it really is impossible to keep up (with the work, and the blogging). Over the last few days there have been the following tradesmen working on the house: electrician, plumber, mason, flooring (wood), tile, metal work, and kitchen installation. The house is literally full of people inside and out each day. Its pretty intense. The good news is that it will be a little bit quieter today as the hardwood flooring is done in the whole house - except the stairs which come much later. Above is a picture of Nora's room fully finished. For the upstairs flooring, we chose to use 3.25" wood floor only upstairs - there just isnt a ton of space that wont be covered by beds and as such, there was no need to spend a lot of extra money on the flooring in the non-living spaces.


Here is a shot of both the girls rooms with the hardwood installed. Its amazing how much different the whole house feels now that the floors are done. I have been looking at the beat up, uneven, and inconsistent flooring for months now, and in one day it was replaced (or over-laid). The house is quieter and seems warmer from a color perspective now that the floors are in. I can only imagine how nice it will be to have power and doors on....


Here is a shot looking from Nora's room all the way to the back of the master bedroom. I took this as I wanted to give an example of how continuous the floor looks when you are up there. I am looking forward to when they sand the floors down and put on the polyurethane, its going to make the place look much bigger with the lighter color the hardwood floors will take on after sanding.


Here is a shot of the master bedroom. The first thing I thought when I walked into this room was that it felt bigger, which is nice. We arent that big on making bedrooms big as one really doesnt do much other then sleep in a room for the most part. However, with us having limited closet space in the master, its important for us to have a space to put a dresser or credenza where we can store items that dont make sense for the closet. This will also give us a place to put a TV if we so choose.


The majority of the girls bathroom was finished yesterday from a tiling perspective. There is no grout on the tiles as well as a few spots where the white tile will have to put up still...but the shower surround is mostly done and I think it looks great! Mostly I am really happy with the look we are getting from the white tile on all of the vertical wall surfaces. Its also giving me hope that the master bathroom design is going to look as good as the girls bathroom.....


Just a little bit closer shot of the contrast between the two styles of tile that I chose for the girls bathroom. Since they are both poreclain, they do have the same sheen, but the color and size difference is really working well together in my opinion. The guy who is doing the tile also has done a very good job of laying the tile tightly together to minimize the grout line and take advantage of the color contrast that we will get from the two tiles.


This was an empty space yesterday morning when the guys from the IKEA installation company started. The shot above is where we ended the day yesterday. As you can see, they got a ton of work accomplished yesterday and are right on pace to be finished today as the anticipated. There have been some bumps in the road related to the way the kitchen lays out and not getting a specific cabinet to the size that I ordered.... but we have figured out a way to make it work where I won't have to make another trip to IKEA (phew). I am excited to see how this all looks today at the end of the day as we will be finished with the kitchen cabinets.

This is a shot of the south wall of the kitchen where the stove and vent hood will be mounted. One the left you can see where the peninsula will be located. The official mantra of the house as it comes together is "its not big, but its functional" and this is embodied more in the kitchen then anywhere else in the house. This kitchen is not going to be huge at all, but we are going to have a lot of very efficient cabinets and all of the bells and whistles of a professional kitchen (pro stove, exterior venting hood, 33" sink). More importantly, because the kitchen is a little bit small, it makes everything within a step or two of each other, and thats useful for how much time is spent there.


One of the things you might have noticed from the shots above is that we really dont have many upper cabinets in the kitchen. This is something that we started back when we were designing the original house and it stuck with this one as well. We really like to feel the kitchen open above the coutner tops, and as such we only added two sets of these "flipper" cabinets. I am really happy with the look we are getting out of these, and they will be very good for the high use items like plates and cups. Whats better: you can open these and leave them open because of the way they open up, so if you are making food and only want to serve one plate at a time, you can just leave the cabinet open and it wont be in your way.


Here is a quick shot of the finish of the cabinets. This is called Abstraktt Grey by IKEA. I think that these cabinets in combination with the counter tops we have chose are going to have a great look and feel. I am really hoping that it looks as good finished as it does in my head.


The design of the garage is finally settled. The only reason it hasn't been settled to this point is because of me. From the beginning of this process I have been thinking of the garage as the place to pickup some extra space. Most of that feeling related to the architects knowing that I could technically build a "habitable" second story over the garage. What I don't think I really fully put together through the process of getting the 2 story garage approved and then designed were: If you are building a habitable space over the garage where you may or may use it every day, you must heat and cool it and build it just like a house. So we were essentially looking at building a mini house replete with radiant heating, insulation, weight bearing floors etc. This was not going to be affordable.

What it really came down to in the end was this - since the garage was not connected to the house, it meant that you had to actually endeavour to go to that space. As such, the space just isnt nearly as useful as it would be were it connected. Moreover, it wasnt going to bear the same sort of value to another buyer down the road either which means there is little to no ROI on the construction as it was.

So, we are doing a simplified version of the previous garage instead. By taking out the living space load bearing requirements of the second floor and the heating and insuation that would have been necessary for the space to be habitable, we have shave quite a bit of money out of the garage budget - making it affordable to build. When its done I think we are going to have a really nice garage that will also define a solid outdoor living space that I will detail a little bit later this week when I start laying it out with the mason.


I dont know why I felt the need to add this in, but there is a certain amount of finality to the AC units being mounted on the sidewalk. Once again I am please that we chose to lay the sidewalk in the way that we did as there is more then enough room to walk past these units on this side of the house, and we will be able to obscure them from the street view with the fence that is going up.

Tons more to talk about over the next few days. Just not enough time in the day. Hoping to get to more later today......stay tuned.

Wednesday, October 27, 2010

A Completely DIfferent House


Ok, so now this is starting to look like a house! The above shot of the first floor is what the flooring company did yesterday - only as a result of some illness amongst the tradesmen on Monday. They laid all of the new 1/2" sub floor, leveled it, and put in the tongue-in-groove hardwood all in one day. Pretty amazing how efficiently these two guys were working yesterday. They will be finishing the foyer and moving to the second floor today. I would guess they will be done with the house tomorrow at the latest.


Here is a little closer look at the wood floor that was being installed yesterday. The design of the hardwood in the first floor is something I have been looking forward to doing since we started designing the first house that we never built. The layout is a combination of 5", 3.25", and 2.25" inch white oak unfinished hardwood flooring. We bought equal amounts of the three widths of flooring and are staggering the widths across the floor. There is no specific design pattern other then I wanted it to be random, and to be equally used. The same width board will run the entire length of the house North-South. Its somewhat hard to tell how its going to look now, but once this is sanded and there are two coats of heavy polyurethane (environmentally friendly of course) this is going to look great and give the house a very long and open feel.

note: the random patches of brown on the top are wood putty they put into the nail holes that end up exposed. If they put it on now, then sand, it ends up looking like there are almost no nail holes.


Next up on the massive change bandwagon: the girls bathroom. Not only did the flooring company start yesterday, so did the tile company. They started with the girls bathroom (the only place we have all of the tile) and go a ton of work done.. There were several factors that went into the choices:

1. The walls needed to be mostly covered with tile as we wanted the bathroom to be more water resistant then the current one
2. We wanted to give the bathroom some color without it being too overwhelming or something that will get old over time.
3. We needed the floor to be stone as we are using a floor heating element which works much better with a stone over a porcelain.

4. I wanted the design to be reasonably tasteful, but still be fun for the girls to use when they are young and not age too poorly as they get a bit older.

So, as you can see from the above, I ended up going with white porcelain 2x8 tile for the majority of the wall space with one continuous line into the shower where the rest of the shower/bath inset is 4x4 red porcelain tile. For the floor I bought 12 x 12 marble tiles and had the tile guy cut them into 6 x 12's and stack them. I really like the look and will be interested to see how much different it looks when the grout goes in.


I am finally that "homeowner" with a dumpster on the street in front of the house instead of in the back yard. Why would I do this you might ask? Well, the mason's are starting to layout the foundation for the garage. I will be updating later tonite with plans and layout as the cement could be poured as soon as Friday.


This is a shot of the "secret" that I have been keeping about the installation I am doing in the house somewhere. I am going to leave it as a mystery for now - partially becasuse I am not 100% sure how its going to work out - but will send some more pics over the next few days as clues.....it should be installed later this week.

Flurry of updates coming the balance of the week with 5 different tradesmen at the house yesterday, today, tomorrow.

Sunday, October 24, 2010

Take One Last Look


In two days this house is going to look completely different on the inside. That huge pile of wood flooring in the center of the photo above will be mostly installed and the house will begin to really take the shape that we are hoping for. The unknown in the process is how long it will take to level and patch the first floor, but Andy (of Andy's flooring) thinks that we are looking at 3-4 total days in the house. He should end up doing the stairs as well (same type of wood, different type of installation), so it could end up being the whole week. Nevertheless, the process will begin in earnest tomorrow in the kitchen. The kitchen area has to be done by Wednesday when the IKEA installers come to put in the kitchen cabinets.


This is a shot of Nora's room. Nothing major to report here other then her room looking quite small right now with no furniture in it. I was in there today doing a bit of cleaning up and thinking that it looked tiny. I have to constantly remind myself that its basically the same size as her current room, and she has a queen bed, a dresser, and a table and chairs in her current room. One funny thing I figured out today about Nora's room: her closet is bigger then the closet in the master bedroom. Funny.

At the paint store yesterday we let Nora choose her own color for her room. The color choice she made is a very subtle pink that is almost white. I think its going to look quite nice.


Here is a shot of Astor's room. This gave me the same feeling as Nora's room. SMALL. While Astor's room is smaller then Nora's (2ft less wide) its still basically the same as her room now where she has a laz-y-boy chair and a table. Her closet is not as big as the master closet, but its darn close. I think that we are going to be able to have the girls suffice in their rooms for many years to come; especially if we get the closets done right from the beginning.


This is a shot I have repeated many times over the past few months. I keep coming back to this shot because it shows the vent and two of the angled cans as well as the windows. See how in this shot the primer wasn't sprayed around the windows? This is because we will be putting trim around the windows and doors and as such, the drywall guys don't get too close to the window for fear of spraying the glass. The trim for the windows and doors should be in by the end of the week, and we are hoping the carpenter will be able to put all of those items into the house next week. Then the house will really start to look finished (even if I don't have door hardware yet).


Here is a shot of our now emasculated master closet. We will be using both the space on the left of the doorway, and the space inset on the right in the doorway as closet space. Its pretty simple to plan out the main closet, but setting up the other closet so it functions properly in conjunction with the main closet is going to be important. Also, this is the first time Jen and I are sharing a closet in at least 10yrs, so its going to be interesting to see how much space we both really take up when we are forced to use the space wisely. Could be very interesting - in the end, I think I know who is going to win this battle.


Here is an off angle shot of the master bathroom fully drywalled. This space is going to be the absolute last space to be finished in the house, and not by choice.....we ordered some very specific tile for the shower, and its taking all of the projected 6 weeks to produce. As a result, we are not going to be able to start on the master bathroom until the 2nd week of November. At that point I would suspect we will just be tying up some loose ends on the house and working on finishing the garage.

Notice the large hole up at the top and wondering what it is? Its going to be a set of clerestory windows that will help bring some much needed natural light into the bathroom. This will essentially be 1-3 pieces of half inch thick tempered glass framed out with painted black trim. When its done, its going to look great, and help the space feel more open.


We had the painters in the house over the weekend to give them a chance to paint the ceilings when their wasn't any flooring down. This makes their life much easier as they don't have to worry nearly as much about the paint splattering all over the place. They painted all of the ceilings in the house with 12 gallons of paint and did it with two guys in less then 8hrs. They also painted the kitchen with some no VOC white eggshell paint in preparation for the kitchen going in on Wed and Thurs. This way we will have a nice solid base down behind the cabinets which is always nice to have.


One of the better things we did in the house is this tube. I am not 100% sure I talked about this before, but I am going to now, so I am sorry if I am repeating myself. With the way we designed the home, we plan on the girls spending a lot of time in the basement as this will be their designated play area. Because of the way the first floor is laid out, if one of us is in the kitchen and the girls are downstairs it will be a bit hard to communicate. So..... I had a PVC pipe run from the wall in the kitchen to the wall in the basement at the base of the stairs. This PVC pipe is meant to be a communications tube. It may sound silly, but the PVC does a great job of amplifying the sound going either direction. Once we are all set, I will have them trimmed to the wall and put some speaker covers over each end (to prevent it from becoming a slide for a toy) and we will not only have a way to communicate between the two floors easily, but we should be able to hear what is going on down there to some degree as well.


Last but not least....the gas line. Good ole People's Gas did everything they could last week to make me turn every shade of red during the process of having the gas service for the house "activated." I am not going to spend a ton of time on this, but in the end we had to run a gas line from under the porch around the corner of the house, and to a point where a meter can be hung for the gas service. This is not the way it was planned, and surely wasnt what People's Gas told me they were coming out to do. I had a whole network of gas line installed in the front of the basement wall that was running to the outside from where the gas service comes into the house (notice the hole in the wall where the pipe used to be?) and we aren't using it at all now.

While I don't hate the way the pipe looks coming out of from under the porch, it was very frustrating figuring out the solution with a company that has absolutely no idea what communication or customer service is. If there are any readers out there that work for People's Gas, I am sorry, but I absolutely cannot stand the company, and would love to have an alternative for my gas service. However, as the worker on Wed clearly pointed out to me: "we are Chicago area Monopoly, you don't have a choice about what to do, its our way or no way." Wonderful way to run a company and service the public huh?


Here is to energy efficiency and finding ways to using as LITTLE gas as possible.

Lots of updates coming this week as we get the floors, power, tile, kitchen, and potentially the one thing on the house that I have not been talking about.....

Friday, October 22, 2010

Primed


The drywalling is officially done. They cut, hung, taped, and sanded 250 - 4' x 12' pieces of dryall in just over 1 week. Not only that, but they did a good job from what I can tell as all of the corners and walls are smooth and straight. Above you can see a picture of the stairwell going up to the second floor from the first floor. One of the other things that is starting to be visible to those that dont actually see the house is the little openings here and there where we will be doing inset pieces of glass to help bring light to different spaces not getting the natural light. We did this just to pull light out of the hallway into the north wall of the kitchen where there was no light.


Here is a shot of the north wall of the master bedroom. I like this shot mainly because you get to see all of the openings that the drywallers had to work around - electrical outlets & switches, ligthing and HVAC ductwork. Its impressive to see how cleanly this all ends up looking when its cut out and done.


Here is a shot of the stairwell from the 2nd floor looking down. Its really starting to turn into what I had hoped it might be when we started this. Now we will have to get all of the protective framing off the windows so they can be painted and the trim can be put on . Its going to really come together nicely when its all said and done.


Here is a shot of the basement. Its nice to actually get a light shot of the basement. Most of the time I head over after work to get pictures, but with the sun setting so early its leaving the basement quite dark with the house next to us on the west blocking the direct sunlight. Because I stopped in at lunch with the camera, I got a much better idea of what we are going to look like when we have power down here. Also, with the floor being a finished cement floor, we are really not going to have an idea about what this finished space is going to look like until the very end as the stain is one of the last things we are going to do.


Starting monday: white oak hardwood flooring and first floor sub-floor. The wood was delivered today and the flooring company will be starting on Monday doing the leveling and installation of the hardwood. We have a very specific design we will be using on the floors that I am not going to get into now (it will be better visually). I do hope that this design ends up bringing some character to the house as well as opening up the space on the first floor.

Tiling will also start on Monday and the painters will be in over the weekend to get the ceilings and some of the walls painted before the flooring goes in. This will allow them to be a little bit messier as they wont have to tarp as much.

More to come over the weekend as I get the place cleaned up and talk about my run-in with People's Gas.


Wednesday, October 20, 2010

.......Aaaaaaand We're Back


After what seems like a long hiatus things are back up and moving. Most of the waiting is related to taping and sanding of the drywall. While this all seems to look the same, I decided it didnt make any sense to post picutres of the same thing day after day. Also, I wasnt in town, so that makes it a bit harder as well. Things are progressing really well. These shots were taken yesterday after the drywallers were finishing up their last round of skim coating the mudded and sanded areas. At this point its basically about smoothing out rough spots and making sure corners are looking sharp. I like the somewhat abstract view above mainly because it looks like some old language lost over time. Taken out of context it could easily be construed as such.


Here is a shot of the first floor from the southeast corner. As you can see there is quite a bit of uniformity in the way that the mud is applied. I have seen some drywall work done in the past, and these guys are quick, efficient, and work with a high level of quality. The other thing you will notice is the house is trashed AGAIN. The good news is I am not the one who is going to have to clean this one up, its part of the price from the drywalling company.


This is a shot of the girls bedrooms. I like this shot mainly because you can get an idea for just how much mud is actually going up. Its a ton of work. One of the biggest hindrances to getting this done any faster has been how much its cooled off over the last week or so. Part of the subjectivity of getting this done relates to how high the humidity is - and how long it takes for the mud to dry so it can be sanded. With all of the corners and joints and edges out there it means lots of mud, and with this cooler weather, lots of waiting. The last coat went on yesterday, and they will not be back out there until tomorrow to get it sanded and then primed.


Here is a shot of the basement mud room. You can see the coat closet in the middle of the picture. One of the great things about this process has been the definition of the space. The basement is pretty hard to get a feel for because its so dark without artificial light. Now that there is some mud on the walls its defining the space a bit better, and I like it. This is what we are planning on making the main entrance/exit of the home for us since we come and go from the garage. As such, its important that this space function correctly, and based on the way its coming together, I think that will be the case when its said and done.


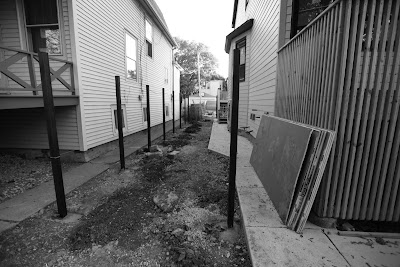
Here is a shot of the fence posts just after they were put in yesterday. We are staring with the fence on the east side of the house as it will be the dogs area for doing their business. I am quite excited to see how the fence comes out as its something I came up with based on other designs I have seen. If the fence person and I are on the same page (this is in doubt) then the fence could end up doing a great job of deflecting some of the "stockiness" that I feel from the house when I approach it. This should be finished up by the end of the week. I hope to be writing glowing reviews of the design by then.

Drywall finishes up tomorrow with the final round of sanding and then spraying the walls with primer. That will pave the way for the flooring people (hardwood and tile) to start on Friday. Next week is going to be a week of major progress with the floors, tile, and kitchen coming together. Its going to be VERY interesting.

Thursday, October 14, 2010

2 Days - Apparently Thats All It Takes


2 days to drywall an entire house. Call me crazy, but I would have thought this would take 3 maybe 4 days to get done. Instead the guys finished screwing up all of the drywall and cleaning out all of the scraps yesterday. Pretty impressive. So now all of a sudden we have a house. Its amazing how this house just came together visually in that short a period of time. You can walk through it and know exactly what we have to work with going forward. Its a very satisfying feeling. I am not going to lie.


Here is a shot looking up into the peak of the hallway. This picture does not do it justice at all. I am very happy that I decided to have this ceiling brought all the way up to the collar ties. Once we get a nice hanging light in there and do what I would like to the space, its going to be one of the focal points of the house. I am pretty excited to see this come together.


This is a shot of the foyer. As I think I have mentioned before, I decided to have the ceiling in the foyer be 1ft lower then the rest of the space in the first floor. I was not sure exactly how it was going to look when its finished, but I am glad that I did it now that I can see it complete. Once the new front door and some of the finishes are up, I think this space will be a nice entry for the home.

Here is a shot looking north in the first floor. The house looks really long from this vantage point. While the "striping" the floor provides helps with the longitudinal feel, its going to be very similar once the flooring is in (laid in a similar pattern) that I think this is pretty representative of the finished feel. Once the walls get mud and are sanded down; I think this space is going to look wide open - exactly what we are looking for.


Part of this process that has been a bit daunting has been choosing finishes like lights. Its really hard to straddle the line between good fixtures and affordable fixtures. One of the things that makes it incredibly hard is the volume of choices. There are just so many fixtures to choose from. Having a style (contemporary) and a finish (chrome) helps, but it still leaves you with hundreds to choose from when going to different sites. The way it has ended up working is a matter of trial and error. You can only tell so much from a website. I have found a few sites that I know and trust, but I am going to be returning three or four fixtures because they just aren't what I was hoping they would be. Its part of the process, I know, but its a bit frustrating when there are lead times on different things and you wait weeks to get something that doesn't look the way you want it to.

The light above is the epitome of what I want from a site and resulting choice. I bought two of these sconces from a higher end lighting design site and was hopeful they were what they looked like on the site. After 4 long weeks these two sconces showed up yesterday and......they were everything I hoped they would we be and maybe a bit more. I couldn't be happier with them, and think they are going to be fantastic in the stairway going down to the basement.

Going to be a quiet few days while they are doing their finishing work on the drywall. The next steps are going to be wood floor, tile work, kitchen installation and painting. Those things will all take us to the end of October when we will begin doing things like counter tops and finishing plumbing and lighting fixtures (called trim).

Tuesday, October 12, 2010

Holy Drywall Progress!


The drywalling started going up yesterday. 250 4'x12' sheets of drywall were delivered on Monday to various parts of the property. The guys took the balance of the day on Monday getting them "stocked" into the house, and due to the surprising heat and humidity, called it a day. So they didnt start hanging drywall until yesterday. Before we get into the drywall work that was done yesterday, there are a few issues that came up with the insulation on Monday.

One of the things that I have found (and was told before we started) was one universal concept in this type of a job: contractors of different trades will always blame another trade for making their job more difficult. We have avoided some of this by using people that know each other in the major mechanical components of the house. However, this reared its head for me on Monday. When I stopped in at lunch to check with the drywaller to make sure everything came in ok, he mentioned that the remnants of the insulation on the studs and select places were going to make his job more difficult. He said we had two options: I could get him a little bit of extra money to make sure things got cleaned up the way he needed them as they went, or they could screw everything up as is, and we could hold our breath that it would be ok. His biggest concern was this: there were places where the foam was protruding, or maybe even un-trimmed. In those places the insulation contractor said you just screw the drywall into place on top of it and it compresses the foam insulation. The drywaller says that this compression will innevitably put enough outward force on the drywall that it will cause nail pops. This is something I am expressly trying to avoid with drywall. I know its going to happen, but in this case I am not cutting a single corner on the drywall and want to make sure we do it 100% right to give us the best chance of long lasting quality drywall. In the end, its my decision to pay what amounts to double for the clean up of the insulation, and in my estimation, its a cost that will be justified tendfold when its finished.

As you can see from the picture above, the drywallers have been trimming the insulation as they go, and the amount they are trimming is fairly substantial. This is the case in the entire house. Much more so in the first and second floor where we are working with the existing structure, but also in parts of the basement as well.


Here is a shot of the first floor looking south to the back of the house. My very first thought when I walked in here yesterday was that it looked bigger then the space I have been looking at for the last three months. The other thing that finally settled in when I saw this space drywalled - the lighting being recessed is such a nice feature to have. We have so many fixtures hanging from our walls and ceilings in our current house. You never realize how much more open a space feels when there isnt a bunch of stuff hanging from the ceiling.


Another shot of the house looking south. This shows a bit more of the wall space behind the accent wall and what its going to look like in the bathroom (which still looks tiny). Whats clear from looking at this is that I am glad we put as much light in the hallway/foyer as we did. That space gets little-to-no natural light, and is going to need plenty of help feeling like anything but a black hole.


Here is a shot of the kitchen. Again, I was happy to see that the space felt bigger. I know a lot of this has to do with the lighter colored walls and the space feeling bigger, but it also gives me hope that the countertops and tile choices we have made in here will work in concert with the lightness concept to continue to allow the space to feel big. Its not a huge space to begin with, but it should be a nice comfortable kitchen.

This is the laundry area. It was too late in the day to get any better shots of the basement, and frankly, its going to be pretty hard to get any decent shots of the basement without a flash as there really isnt much good natural light in there. Whats amazing is these guys put the drywall up entirely in the first floor and basement in one day. They said they will be finished with the second floor today, and will begin on the taping and mudding as soon as possible.

The goal is to be done with the drywall by next Wednesday, and flooring and til will start on Thursday. That means we could have a completely developed home with the exception of finishes like doors, trim, and lighting fixtures; by the end of the month.

Moving in by the end of November should happen barring us being behind in some major way that I am not seeing right now.